Introduction to React
React는 단방향 데이터플로우를 가지고 있음
데이터 -> UI (항상 이 방향)
데이터가 변하면 UI가 변함
UI에서 데이터를 바꿀 순 없음
리액트 : UI 라이브러리 (프레임워크 X)
리액트는 VIEW이기 때문에 파이썬, 루비 등등과 같이 쓸 수 있다
리액트는 view이기 때문에
model과 controller랑 섞어 쓸 수 있다
리액트를 장고 루비 노드.js랑 섞어쓸 수 있다
API Documentation - YTS YIFY
Official YTS YIFY API documentation. YTS offers free API - an easy way to access the YIFY movies details.
yts.lt
에서 영화 api 긁어올거임
Introduction to Create React App
리액트를 자바스크립트로 바꿔주는 툴이 필요해
트랜스파일러 : 웹팩 이걸 쓸거임
es6 ecmascrips6
웹팩을 이용해 최근 자바스크립트를 브라우저가 이해할수있게 변경해줘야해
webpack
webpack is a module bundler. Its main purpose is to bundle JavaScript files for usage in a browser, yet it is also capable of transforming, bundling, or packaging just about any resource or asset.
webpack.js.org
이거 대신 create react app 이 문구 안에 웹팩 파일이 숨어있는 셈!
https://github.com/facebook/create-react-app
facebook/create-react-app
Set up a modern web app by running one command. Contribute to facebook/create-react-app development by creating an account on GitHub.
github.com
JSX : 리액트 컴포넌트 만들 때 사용하는 언어
리액트 : UI 라이브러리
리액트DOM : 리액트(라이브러리)를 웹사이트에 출력하는걸 도와주는 모델
Document Object Model
리액트를 모바일 앱에 올리고 싶다 -> React Native 쓴다
리액트돔은 하나의 컴포넌트를 렌더한다. index.js 보기!
Data flow with Props
https://www.youtube.com/watch?v=vUB3TfLWzL0
그전에 array map에 대해 공부해보자!
const days = ["Mon", "Tue", "Wed", "Thurs", "Fri"];

// map()
// 모든 배열의 아이템에 function을 실행하는 함수.
// 그리고 그 함수의 결과 값으로 새로운 배열을 만든다.

// days.map()의 의미
// days에 있는 모든 요일에 function을 실행한다!
// 그리고 그 function에서 나온 값을 저장해서 새로운 배열을 만든다
// return한 값으로 이루어진 배열을 return한다.

// const smilingDays = days.map(potato => console.log(potato))
// console.log(smilingDays);

// day : 각각의 아이템
// map은 하나의 인자만 전달하지 않아. 그 중 하나가 index
// const addSmile = (day) => `😀 ${day} `;
const addSmile = (day, index) => `#${index + 1} ${day} `;

// map은 함수가 준 값으로 이루어진 배열을 return해

// => 뒤의 값을 return!
// days.map()은 day라는 인자를 가지고 addSmile function을 호출한다.
const smilingDays = days.map(addSmile);
console.log(smilingDays);

// 보통의 function으로 return 하고 싶다면
// map(potato => {
//   return 'somethib'
// })
App.js
import React, { Component } from 'react';
import './App.css';
import Movie from "./Movie";

const movies = [
  {
    title: "스파이더맨 파 프롬 홈",
    poster: "https://upload.wikimedia.org/wikipedia/ko/thumb/c/cb/%EC%8A%A4%ED%8C%8C%EC%9D%B4%EB%8D%94%EB%A7%A8_%ED%99%88%EC%BB%A4%EB%B0%8D.jpg/250px-%EC%8A%A4%ED%8C%8C%EC%9D%B4%EB%8D%94%EB%A7%A8_%ED%99%88%EC%BB%A4%EB%B0%8D.jpg"
  },
  {
    title: "가디언즈 오브 갤럭시",
    poster: "https://terrigen-cdn-dev.marvel.com/content/prod/1x/guardiansofthegalaxyvol.2_lob_crd_01.jpg"
  },
  {
    title: "앤트맨과 와스프",
    poster: "https://upload.wikimedia.org/wikipedia/ko/thumb/5/52/%EC%95%A4%ED%8A%B8%EB%A7%A8%EA%B3%BC_%EC%99%80%EC%8A%A4%ED%94%84.jpg/250px-%EC%95%A4%ED%8A%B8%EB%A7%A8%EA%B3%BC_%EC%99%80%EC%8A%A4%ED%94%84.jpg"
  },
  {
    title: "엔드 게임",
    poster: "https://upload.wikimedia.org/wikipedia/ko/f/f2/%EC%96%B4%EB%B2%A4%EC%A0%B8%EC%8A%A4-_%EC%97%94%EB%93%9C%EA%B2%8C%EC%9E%84_%ED%8F%AC%EC%8A%A4%ED%84%B0.jpg"
  },
]


export default class App extends Component {
  render() {
    return (
      <div className="App">
        {movies.map(movie => {
          return <Movie title={movie.title} poster={movie.poster} />
        })}
      </div>
    );
  }
}
이런식으로 map 이용!
Validating Props with Prop Types
리액트는 엘리먼트가 많을 경우 고유한 unique key를 줘야해
index.js:1375 Warning: Each child in a list should have a unique "key" prop.
Check the render method of `App`. See https://fb.me/react-warning-keys for more information.
in Movie (at App.js:30)
in App (at src/index.js:7)
이런에러가 콘솔에서 난닥
return 부분 이렇게 바꿔주기 index가 unique하니까!
      <div className="App">
        {movies.map((movie, index) => {
          return <Movie
                    title={movie.title}
                    poster={movie.poster}
                    key={index} />
        })}
      </div>
그럼 콘솔에서 에러 사라질거야
포스터에 출력되는 값이 숫자나 true/false 같은 값이 되는걸 원하지 않는다면?
$ npm add prop-typesimport PropTypes from "prop-types";
export default class Movie extends Component {
// 부모 컴포넌트에서 얻는 것이 무엇인지 체크할 수 있다!
static propTypes = {
title: PropTypes.string.isRequired,
poster: PropTypes.string.isRequired
}Component Lifecycle
컴포넌트는 여러 기능을 정해진 순서대로 실행하는데 그걸 배울거임!
컴포넌트가 '존재'하기 시작하면, 리액트 세계는 will mount -> did render -> did mount를 할거임
// Render
componentWillMount()
-> render()
-> componentDidMount()
// Update
componentWillReceiveProps() : 컴포넌트가 새로운 props를 받음
-> shouldComponentUpdate() : 리액트는 old props, new props르 살펴본 다음 서로가 다르면 업데이트 = true라고 생각함 그러면 업데이트!
-> componentWillUpdate() : 이곳에 뱅글뱅글 돌아가는 spinner를 붙일 수 있겠다!
-> render()
-> componentDidUpdate : 로딩 중 메시지나 아이콘 숨기기!
Thinking in React Component State
state는 리액트 컴포넌트 안에 있는 오브젝트
state가 바뀔 때 마다 컴포넌트는 다시 render
  componentDidMount() { // 3
    console.log('did mount');
    // 데이터 관련 작업

    // 컴포넌트가 mount되면 5초 기다리고 greeting 업데이트
    setTimeout(() => {
      this.setState({
        greeting: 'hello again' // 컴포넌트가 mount할 때마다 헬로 -> 헬로 어겐으로 변경
      });
    }, 1000) // 5000 : 5초
  }

  state = {
    greeting: 'hello',
  }
render에서 {this.state.greeting}
그러면 state가 1초뒤에 바뀌니까 다시 render돼서
hello -> hello again 으로 바뀌겠지!
Practicing this setState
  componentDidMount() { // 3
    // setTimeout(fn, 5000) // 5초 뒤에 fn 작업을 한다

    // old javascript. function을 다 쓰지 않아도 됨
    // setTimeout(function() {
    //   console.log('hello');
    // }, 1000)

    // new javascript
    setTimeout(() => {
      // console.log('hello');
      this.setState({
        movies: [
          ...this.state.movies, // 이 코드를 삭제하면 아래 추가한 영화만 리스트에 남겠지.
          // 이전 영화 리스트를 그대로 두고, 아래 영화를 '추가'하라는 뜻
          {
            title: "닥터 스트레인지",
            poster: "https://news.imaeil.com/inc/photos/2018/11/02/2018110222205687056_l.jpg"
          },
          // ...this.state.movies, // 이곳에 추가하면 닥터스트레인지가 첫번
        ]

      })
    }, 1000) // 1초 뒤에 이 영화 보여짐
  }
응용 : 스크롤하면 더 많은 영화가 로딩되는 효과처럼!
infinite scroll
인스타 페북 이런식으로 추가 컨텐츠를 로딩!
old javascript & new one 확인!
Loading states
https://www.youtube.com/watch?time_continue=271&v=TyBLxIQB1qM
안녕하세요, 니콜라스 샘 동영상을 코딩을 왜하는지 영상으로 접한 학생입니다. 우선 너무 강의 재미있게 잘 보구있구요. 궁금한점이 있어서 그런데, setTimeout을 할때 한 컴포넌트는 한번밖에 setTimeout못하는지 여쭙고 싶습니다. Hi Nicolás, i started to watch your Youtube videos after i got inspired by one of your clip about why we need coding for our life which i really need in order to achieve what i want to create/ work for. First of all, thank you for your support for all the coders out there providing this wonderful tutorials. I hope to see your videos continuously and your channel grow bigger. However, i got a question with the setTimeout whether if we can use it multiple times in one component. For example, if i want to make it as a panel with images continuously changes with certain set of times with infinitely looping them over and over again. (like any other general websites), is there anyway that we could use the setTimeout? Thank you!
간략히
답글 숨기기

Thanks for your words!! setTimeout is used to delay a function for X amount of time. If you want to run a function every X amount of time forever then what you need is setInterval (https://developer.mozilla.org/en-US/docs/Web/API/WindowOrWorkerGlobalScope/setInterval)
간략히
1

thank you so much!!!!!!!!!
App.js
import React, { Component } from 'react';
import './App.css';
import Movie from "./Movie";

export default class App extends Component {

  // Render : componentWillMount() -> render() -> componentDidMount()
  // Update : componentWillReceiveProps() : 컴포넌트가 새로운 props를 받음 -> shouldComponentUpdate() : 리액트는 old props, new props르 살펴본 다음 서로가 다르면 업데이트 = true라고 생각함 그러면 업데이트!  -> componentWillUpdate() : 이곳에 뱅글뱅글 돌아가는 spinner를 붙일 수 있겠다! -> render() -> componentDidUpdate : 로딩 중 메시지나 아이콘 숨기기!

  // componentWillMount() { // 1
  //   console.log('will mount');
  //   // API에 작업 요청
  // }

  componentDidMount() { // 3

    setTimeout(() => {
      this.setState({
        movies: [
          {
            title: "닥터 스트레인지",
            poster: "https://news.imaeil.com/inc/photos/2018/11/02/2018110222205687056_l.jpg"
          },
          {
            title: "스파이더맨 파 프롬 홈",
            poster: "https://upload.wikimedia.org/wikipedia/ko/thumb/c/cb/%EC%8A%A4%ED%8C%8C%EC%9D%B4%EB%8D%94%EB%A7%A8_%ED%99%88%EC%BB%A4%EB%B0%8D.jpg/250px-%EC%8A%A4%ED%8C%8C%EC%9D%B4%EB%8D%94%EB%A7%A8_%ED%99%88%EC%BB%A4%EB%B0%8D.jpg"
          },
          {
            title: "가디언즈 오브 갤럭시",
            poster: "https://terrigen-cdn-dev.marvel.com/content/prod/1x/guardiansofthegalaxyvol.2_lob_crd_01.jpg"
          },
          {
            title: "앤트맨과 와스프",
            poster: "https://upload.wikimedia.org/wikipedia/ko/thumb/5/52/%EC%95%A4%ED%8A%B8%EB%A7%A8%EA%B3%BC_%EC%99%80%EC%8A%A4%ED%94%84.jpg/250px-%EC%95%A4%ED%8A%B8%EB%A7%A8%EA%B3%BC_%EC%99%80%EC%8A%A4%ED%94%84.jpg"
          },
          {
            title: "엔드 게임",
            poster: "https://upload.wikimedia.org/wikipedia/ko/f/f2/%EC%96%B4%EB%B2%A4%EC%A0%B8%EC%8A%A4-_%EC%97%94%EB%93%9C%EA%B2%8C%EC%9E%84_%ED%8F%AC%EC%8A%A4%ED%84%B0.jpg"
          },
        ]

      })
    }, 1000)
  }

  state = {


  }

  _renderMovies = () => {
    const movies = this.state.movies.map((movie, index) => {
      return <Movie title={movie.title} poster={movie.poster} key={index} />
    })
    return movies
  }

  render() { // 2
    console.log('did render');

    return (
      // 영화가 state에 없으면 loading 띄우기
      <div className="App">
        {this.state.movies ? this._renderMovies() : 'loading' }

      </div>
    );
  }
}
Smart vs Dumb
dumb component : state가 없는 컴포넌트 : stateless functional 컴포넌트 only have props
smart component : state가 있다
props만 있으면 functional 컴포넌트로 바꾸면 됨. stateless component
class MoviePoster extends Component {

    static propTypes = {
        poster: PropTypes.string.isRequired
    }

    render() {
        return(
            <img width="300" height="400" src={this.props.poster} />
        );
    }
}

// 위와 아래는 같다!

// don't have state
// render x lifecycle x
// only have return
function MoviePoster({poster}) {
    return (
        <img width="300" height="400" src={poster} />
    );
}
어떤 컴포넌트는 return만 하기위해 존재해.
component will mount, update state 등등 필요 없어 이런게
그냥 한 개의 props와 한 개의 html 태그만 필요해.
MoviePoster.propTypes = {
    poster: PropTypes.string.isRequired
}
props도 확인하면 좋겠지요!
Movie.js 최종 (Movie, MoviePoster 모두 dumb로 만듦)
// import React, { Component } from 'react';
import React from 'react'; // Component 사용하지 않으므로!
import PropTypes from "prop-types";
import './Movie.css';

function Movie({title, poster}) {
    return (
        <div>
            <MoviePoster poster={poster} />
            <h1>{title}</h1>
        </div>

    );
}

// don't have state
// render x lifecycle x
// only have return
function MoviePoster({poster}) {
    return (
        <img width="300" height="400" src={poster} />
    );
}

Movie.propTypes = {
    title: PropTypes.string.isRequired,
    poster: PropTypes.string.isRequired
}

MoviePoster.propTypes = {
    poster: PropTypes.string.isRequired
}
여기서는 this.props가 안먹힘! 클래스가 아니니까!
class들은 그 안에 this라는 키워드가 있다.
근데 이건 functional 컴포넌트라 this 필요없다. 이미 props를 쓰니까!
AJAX on React
AJAX : Asynchronous Javascript And XML
우리는 XML 신경 안쓰고 JSON을 신경쓴다!!
JSON : JavaScript Objec Notation
오브젝트를 자바스크립트로 작성하는 기법
에이작스를 리액트에 적용하자!
Fetch 덕분. 뭔가를 잡는다는 뜻
https://yts.lt/api/v2/list_movies.json
이 url에 있는 json을 가져올거임!
여기서 list movies를 보면 내가 설정한 값으로 영화 정렬 가능!
https://yts.lt/api/v2/list_movies.json?sort_by=rating
이런식으로 url에 직접 parameter 넣어줘도 됨

  componentDidMount() { // 3
    fetch('https://yts.lt/api/v2/list_movies.json?sort_by=rating')
  }
이렇게 하면 AJAX + REACT 성공!
Network에 보이죵
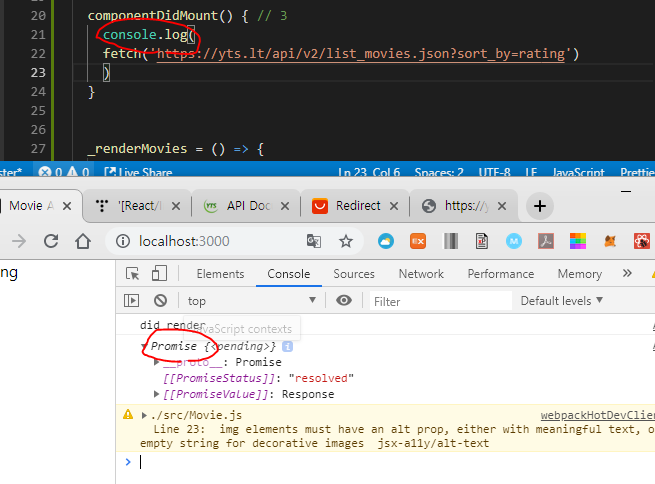
promise는 뭐지? 다음 강의에서!
에이작스는 url을 자바스크립트로 비동기화 방법을 불러온다.
그래서 Asynchro~
사실은 AJAJ
마지막이 Json으로 바뀜! Xml은 너무 오래됨
ajax 쓰는 이유 : 뭔가를 불러올 때마다 페이지 새로고침 하고 싶지 않아서.
자바스크립트와 같이 데이터 다룰수있어 뒤에 숨어서!
데이터 가져오는 상황을 볼 수 있다.
새로고침없이 작업 가능. 리액트와 작업이 간편해서 ajax 추천!
Promises
promise는 새로운 자바스크립트 컨셉.
asynchronous programming이다
비동기란?
라인1
라인2
라인1이 끝나지 않아도 라인2가 실행!
모든 작업은 다른 작업과 상관없이 수행된다.
Promise는
시나리오 잡는 방법을 만들어준다
영화를 보러가거나 돈없어서 못보거나.
2가지 시나리오가 있다.
영화 보면 좋은 일이 생기고 못보면 안좋은 일이 생기겠지
fetch promise는 시나리오가 생기고 이를 관리할 수 있다
  componentDidMount() { // 3
    fetch('https://yts.lt/api/v2/list_movies.json?sort_by=rating')
    // then function은 1개의 attribute만 줘 그것은 object. fetch의 결과물
    .then(response => console.log(response)) // 성공적 수행이 아니라 그냥 작업이 끝나면

    .catch(err => console.log(err)) // 혹시 에러가 나면 보여줘

    // old javascript
    // .catch(function(err) {
    //   console.log(err)
    // })
  }
response를 개발자 도구 콘솔에서 보면
body: ReadableStream
이거는 바이트로 이루어져있다는 뜻 그래서 제이슨으로 바꿔야 함 super-easy
.then(json 부분 추가!!
  componentDidMount() { // 3
    // This is Asynchronous
    // fetch는 url을 에이작스로 불러올 수 있다!
    fetch('https://yts.lt/api/v2/list_movies.json?sort_by=rating')
    // then function은 1개의 attribute만 줘 그것은 object. fetch의 결과물
    .then(response => response.json()) // 성공적 수행이 아니라 그냥 작업이 끝나면
    .then(json => console.log(json)) // json으로 변환하기
    .catch(err => console.log(err)) // 혹시 에러가 나면 보여줘

    // old javascript
    // .catch(function(err) {
    //   console.log(err)
    // })
  }
따란~
Async Await
Async, Await : 위에서 작성한 코드를 좀 더 분명하게 작성하는 도구 (fetch, then then ~~~)
App.js
import React, { Component } from 'react';
import './App.css';
import Movie from "./Movie";

export default class App extends Component {

  // Render : componentWillMount() -> render() -> componentDidMount()
  // Update : componentWillReceiveProps() : 컴포넌트가 새로운 props를 받음 -> shouldComponentUpdate() : 리액트는 old props, new props르 살펴본 다음 서로가 다르면 업데이트 = true라고 생각함 그러면 업데이트!  -> componentWillUpdate() : 이곳에 뱅글뱅글 돌아가는 spinner를 붙일 수 있겠다! -> render() -> componentDidUpdate : 로딩 중 메시지나 아이콘 숨기기!

  // componentWillMount() { // 1
  //   console.log('will mount');
  //   // API에 작업 요청
  // }

  state = {


  }

  componentDidMount() { // 3
    this._getMovies();
  }


  _renderMovies = () => {
    const movies = this.state.movies.map((movie) => {
      console.log(movie)
      return <Movie title={movie.title} poster={movie.large_cover_image} key={movie.id} />
      // key는 map의 index를 사용하지 않는 것이 좋음. 느리기 때문.
    })
    return movies
  }

  _getMovies = async () => { // async를 안쓰면 await이 동작하지 x
    // 이 함수는 비동기 함수이고 movies라는 variable을 갖고 있어
    // 그리고 이건 value를 갖고 있어. await 모드인 _callApi 함수를!
    const movies = await this._callApi();
    // await : callApi가 끝나기를 기다림. 성공적으로 수행하는 것을 기다리는 것이 아니라!
    // callApi의 return value가 무엇이든 그냥 그 value를 movies에 넣을거야

    this.setState({ // 그러나 이 라인은 callApi 작업이 완료되기까지 수행 안해 이 작업이 실패로 끝나더라도!
      movies // this is modern javascript. 그냥 이렇게 쓰면 state에서 정의 안해도 되나봐
    })
  }

  _callApi = () => {

    // This is Asynchronous
    // fetch는 url을 에이작스로 불러올 수 있다!
    return fetch('https://yts.lt/api/v2/list_movies.json?sort_by=rating')
    // then function은 1개의 attribute만 줘 그것은 object. fetch의 결과물
    .then(response => response.json()) // 성공적 수행이 아니라 그냥 작업이 끝나면
    // return json.data.movies 안해도 => 가 그 역할(return) 한다 : arrow fucntion
    .then(json => json.data.movies) // json으로 변환하기
    .catch(err => console.log(err)) // 혹시 에러가 나면 보여줘

    // old javascript
    // .catch(function(err) {
    //   console.log(err)
    // })
  }

  render() { // 2
    console.log('did render');
    // console.log('dd');
    // console.log(this.state.movies);

    return (
      // 영화가 state에 없으면 loading 띄우기
      <div className="App">
        {this.state.movies ? this._renderMovies() : 'loading' }

      </div>
    );
  }
}
Updating Movie
Movie.js
// import React, { Component } from 'react';
import React from 'react'; // Component 사용하지 않으므로!
import PropTypes from "prop-types";
import './Movie.css';
function Movie({title, poster, genres, synopsis}) {
return (
// className : 정상적인 css에서 class를 뜻함. JSX에서는 class가 아닌 className을 써야함
<div className="Movie">
<div className="Movie__Columns">
<MoviePoster poster={poster} alt={title} />
</div>
<div className="Movie__Columns">
<h1>{title}</h1>
<div className="Movie__Genre">
{genres.map((genre, index) => <MovieGenre genre={genre} key={index} />)}
</div>
<p className="Movie__Synopsis">
{synopsis}
</p>
</div>
</div>
)
}
export default Movie;
// don't have state
// render x lifecycle x
// only have return
function MoviePoster({poster, alt}) {
return (
<img className="Movie__Poster" alt={alt} title={alt} width="300" height="400" src={poster} />
)
}
function MovieGenre({genre}) {
return (
<span className="Movie__Genre">{genre} </span>
)
}
Movie.propTypes = {
title: PropTypes.string.isRequired,
poster: PropTypes.string.isRequired,
genres: PropTypes.array.isRequired, // array!!
synopsis: PropTypes.string.isRequired
}
MoviePoster.propTypes = {
poster: PropTypes.string.isRequired,
alt: PropTypes.string.isRequired
}
MovieGenre.propTypes = {
genre: PropTypes.string.isRequired
}CSS for Movie
긴 줄거리 짧게 출력하는 방법
https://www.npmjs.com/package/react-lines-ellipsis
react-lines-ellipsis
Simple multiline ellipsis component for React.JS
www.npmjs.com
Building for Production
static file : js, css, html 프론트엔드 파일 not 백엔드 파일
이러한 static file을 공짜로 호스팅할 수 있게 해줌.
깃헙에 배포할거임
서버 실행
npm start
빌드
npm run build !!!!!! 이거
yarn build
css를 가져다가 압축한다
build 폴더 생겼다!
package.json
"homepage": "http://daheeahn.github.io/learn-react-js_0624"추가!
다시 npm run build
수정했기 때문
그리고 터미널 보고 하라는대로 하기
daheeahn.github.io
이 Repository 있어야함
gh-pagesUpdated 1 minute ago by daheeahn
daheeahn/daheeahn.github.io
인프런 React JS 배우기 - 영화순위 가져오기. Contribute to daheeahn/daheeahn.github.io development by creating an account on GitHub.
github.com
새로운 branch가 생겼다!
5분정도 기다리면 배포된 것을 확인할 수 있다.
css는 자세히 다루지 않음.
https://github.com/daheeahn/190624_MovieApp
daheeahn/190624_MovieApp
인프런 - 리액트 처음이시라구요? React JS로 웹 서비스 만들기! Contribute to daheeahn/190624_MovieApp development by creating an account on GitHub.
github.com
'Study > Frontend' 카테고리의 다른 글
| React Apollo (0) | 2020.02.05 |
|---|---|
| TDD 개발 방법론 (0) | 2019.09.14 |
| react-navigation (0) | 2019.07.07 |
| [React Native/Inflearn] React Native로 ToDo 앱 만들기 (0) | 2019.06.24 |
| [React/Inflearn] 생활코딩 React (0) | 2019.06.22 |