1. 첫 발걸음
분산 어플리케이션 = dapp
2. 환경설정
1) 이더리움 DAPP 개발환경 셋업 1 (Geth, 가나슈, 노드.js, 트러플)
Geth = Go ethereum : 풀이더리움노드를 내 로컬환경에서 커맨드라인인터페이스를 통해 실행시킴
powershell 에서 geth version 잘 설치됐는지
geth version
가나슈 설치
https://github.com/trufflesuite/ganache/releases/tag/v1.1.0
trufflesuite/ganache
Personal blockchain for Ethereum development. Contribute to trufflesuite/ganache development by creating an account on GitHub.
github.com
1.1.0 appx 다운로드
가나슈 : 스마트 컨트랙트 개발단계에서 편리한 인터페이스 제공
(나는 제일 최근거 설치)
- test rcp의 업그레이드 버전
- 이더리움 노드를 인메모리로돌려서 빠른속도로 트랜잭션 처리
- 계정도 미리 생성되어있다
- 스마트컨트랙트 테스트하기에 최적의 툴
current block : 노드에서 채굴한 마지막 블록 넘버
gas price : 노드가 트랜잭션 채굴하기 위한 최소한의 가스 가격
gas limit : 트랜잭션 무사히 마치기 위한 최대한의 가스
network id : 가나슈 서버의 내부 블록체인 식별 id
rpc server : geth나 metamask 이 주소로 연결하면 가나슈 그대로 쓸수있게 함
mining status : 새로운 블록 채굴하는 속도 보여줌
MNEMONIC : 연산기호 (여러 단어)
node.js : 서버사이드 자바스크립트 플랫폼 분산어플리케이션에서 꼭 필요하다
npm : 개발하면서 툴이나 라이브러리 다운받기위해 꼭 필요
truffle : 스마트 컨트랙트 컴파일하고 테스트하고 배포도 할수있게해주는 프레임워크
꼭 버전 4 이상! 이것도 npm으로 다운받음
여기서 에러났는데 강의에 나온 코드는 다 나오고 추가에러코드가 나옴....
truffle version하면 잘 나옴 일단 패스
=> npm uninstall -g truffle
=> npm install -g truffle@4.1.15
node -v
npm -v
truffle version
2) 이더리움 DAPP 개발환경 셋업 2 (VSCODE, 메타마스크)
vscode에서 ctrl shift p -> display 검색하면 언어 설정가능 ko로 바꾸기
solidity 설치 맨아래 네모 클릭하면 검색 가능
metamask : 이더리움 개인 지갑
인퓨라라는 원격 이더리움 노드를 통해 이더리움 네트워크에 접속한다.
가나슈 서버포트 넘버 8545로 바꾸고
메타마스크 로컬 8545에서 시드구문으로 접속하면 가나슈 계정 자동으로 메타에서 보임
create account하면 자동으로 랜덤으로 생성된다는데?
import 계정은 가나슈의 private key 이용해서 계정 불러오면 됨
3) Geth로 프라이빗 노드 구축 1 (제네시스 블록, 계정 생성)
Geth 사용해 로컬환경에 이더리움 노드 구축
1. 제네시스 블록 생성
2. 3개 새로운 계정 생성
일단 blockchain폴더 파워쉘에서 만든다.
이더리움은 작업증명 pow
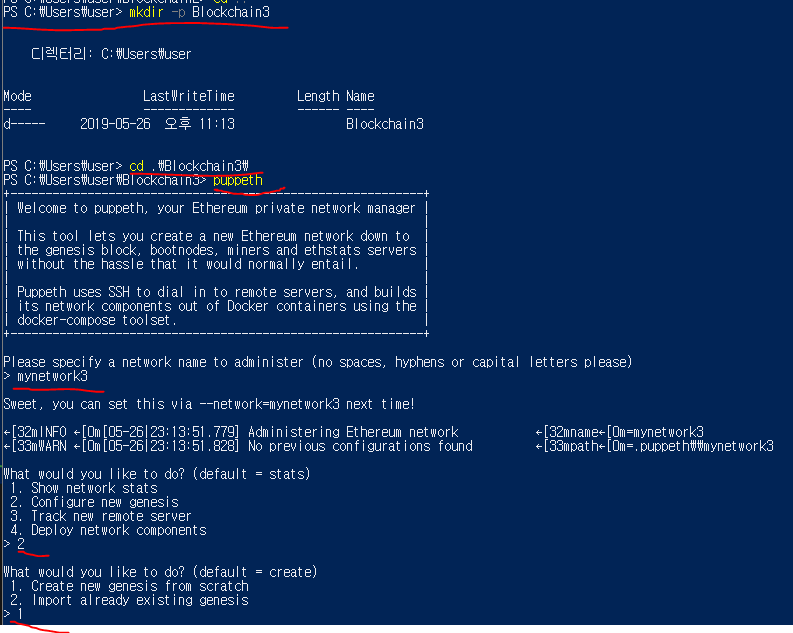

그리고 폴더 들어가보면 제네시스 파일 생성되어이씀
mynetwork3.json 파일 보기
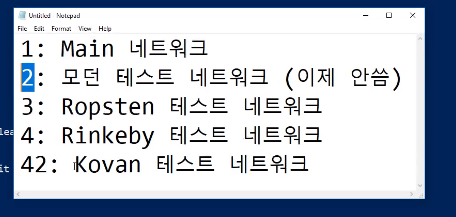
네트워크 아이디는 이거 피해서 => 나느 12345
timestamp
연속되는 두 개 블록 타임스탬프 차이 작으면 난이도는 올라가고 크면 내려간다.
difficulty 높으면 채굴 시간 길어짐
이제 제네시스블록 만들었으니 프랑이빗 노드 초기화 해보자
geth --datadir . init mynetwork3.json
geth(모든 체인에 대한 데이터 저장됨)와 keystore(계정 저장 공간) 폴더 생김
계정 만들어보자
geth --datadir . account new
1234 (pw)
keystore에 이더리움 계정 3개 있겠지
geth --datadir . account list
계정 리스트 생성한 순서대로 볼 수 있음
geth로 프라이빗 노드? 3개 만듦.
첫번째로 생성된 accunt는 모든 채굴보상금 들어가는 계좌,, 라는데?
노드 초기화 했으니 이제 실행하자!
4) Geth로 프라이빗 노드 구축 2 (노드 첫 실행, DAG 파일 생성)
노드 초기화 했으니 이제 실행하자!
code nodestart.cmd
geth --networkid 4386 --mine --minerthreads 2 --datadir "./" --nodiscover --rpc --rpcport "8545" --rpccorsdomain "*" --nat "any" --rpcapi eth,web3,personal,net --unlock 0 --password ./password.sec 나는 networkid 12345
code password.sec
1234
그리고 ./nodestart.cmd ㄱㄱ
안되면 가나슈 파워쉘 다 끄고 다시 해보기
DAG : 방향성 비순환 그래프
에타시 채굴에서 필요한 데이터구조
노드맨첨실행했을때 이걸 먼저 생성
채굴위해 대그파일이 필요
epoch 0 끝나면 1 시작
1되고 percentage 100%되면 끄읕
appdata - ethash에 있어
그담 이제 채굴 시작
number는 블록넘버
트랜잭션 없어도 채굴~~
블록채굴 이유 : 트랜잭션 처리, 새로운 에더 생성 목적
5) Geth로 프라이빗 노드 구축 3 (Geth 콘솔)
노드 계속 채굴하는 동안 새 파워쉘 열어

백그라운드로 돌고있는 노드에 연결시켜서 자바스크립트 콘솔을 여는 것
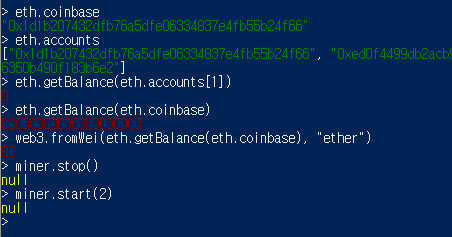
8200000 이건 wei야 그래서 ether로 다시 나타나게 한거임
wei : eth 나타내는 단위 중 가장 낮은 것
2는ㄴ 몇개의 스레드에서 채굴하게할지
많이할수록 채굴 빨라지는데 파워를 많이 잡아먹어
unlock : 그 계정의 개인키를 열어서 트랜잭션에 서명할 수 있게 함
개인키는 lock 되어있는게 default
coinbase는 보상 받기 위해 unlock 시켰었지
2번째 계정 unlock 해보자

200초 동안 unlock
그리고 돈도 보냄
트랜잭션 해쉬가 리턴. 노드로 보내짐.
이게 다음블록 채굴될때 이게 추가됨.

다른 파워쉘임 채굴중인.
이제 두번째 계정의 잔액 확인!
> eth.getBalance(eth.accounts[1])
20000000000000000000
> exit
내 로컬환경에서 돌아가고 있는 이더리움 노드의 geth 콘솔 연결해서 계정 정보, 채굴 멈추기 eth 송금하는거 해봤다
geth로 private 노드 구축해보며 실제 이더리움 노드가 어떻게 돌아가는지 알아봤음
3. 솔리디티 스마트 계약 이론
1) 컨트랙의 구조
2) 접근 제어자
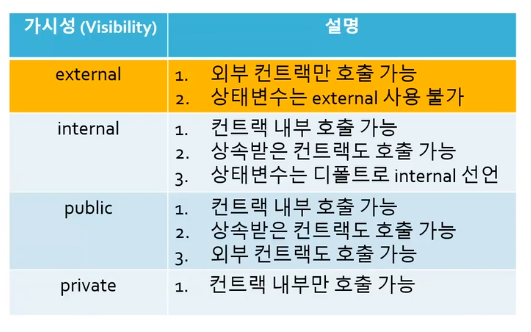
함수는 public이 default (그러나 warning msg줘서 public으로 명시하는게 낫다)
private 상속받은 컨트랙에서 호출 불가
3) 함수 타입 제어자
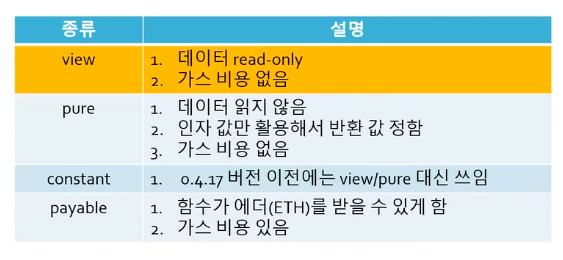
constant 거의 안쓰임
4) 값 타입


uint : 양수만 그래서 주로 쓰는데, int보다 저장할 수 있는 수의 크기가 더 크다.

이더링무 주소만큼의 사이즈
주소의 길이는 0x빼고 40글자
address.balance
address.transfer : 이 주소에 eth 보낼 수 있다.


solidity는 string에 최적화 되어있지 않음
32바이트 넘기면 string 쓰고 그렇지 않으면 byte 쓰고
hello world는 아래처럼 바꿔서 저장... 이건 해주는 함수가 있다
string이 byte보다 가스 많이 발생

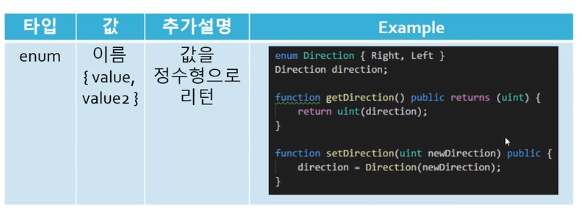
5) 참조 타입 : 데이터 위치


uint16 myAge는 memory
배열 uint[] studentAges 는 stroage !!!!! 주의
studentAges값 변경될 때 상태변수 ages의 값도 동시에 영원히 변경 ***
6) 참조 타입 : 배열


a 선언할 때 default는 storage인데 (배열이니까) memory로 바꿈
메모리 배열은 size를 다시 정해주는게 불가능 -> 첨부터 사이즈 잘 지정해줘야해
[] 안에 값 입력한게 literal
literal 통해 초기화
함수 밖에서 literal로 선언하면 error 안나는데 uint8[3] d 처럼 하면 error
push는 저장위치가 memory인 배열은 쓸 수 없다
length 는 memory와 storage 둘 다 쓸 수 있다
7) 참조 타입 : 구조체


stroage로 하면 포인터 역할을 핳ㄴ다!??!??!?************ 5) 참고
memory로 하면 포인터 x updateStudent2
8) 참조 타입 : 매핑
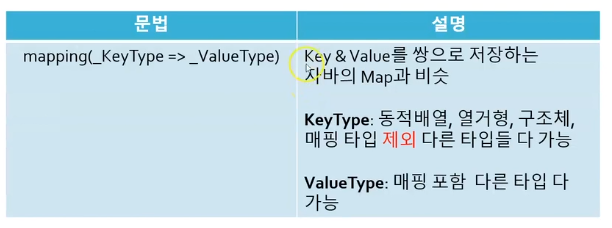
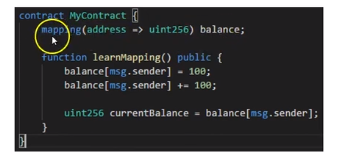
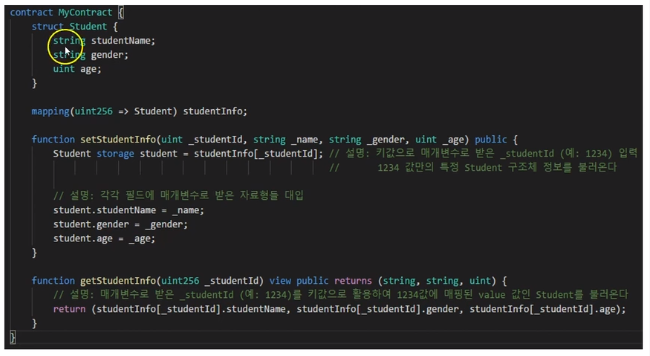
아직 구조체 자체를 리턴하는 것은 지원 안함...
4. 솔리디티 스마트 계약 실전
1) Remix 테스팅 & 디버깅1
0.4.24버전
오토컴파일
예제1
pragma solidity ^0.4.24;

contract MyContract {
    uint[] ages;

    function learnDataLocation(uint[] newAges) public returns (uint a) {
        ages = newAges;
        uint16 myAge = 44;
        uint[] storage studentAges = ages;

        studentAges[0] = myAge;

        a = studentAges[0];

        return a;
    }
}
javascript vm 클릭
injected web3 : 메타마스크
web3 provider : geth나 가나슈의 엔드포인트 주소입력
deploy 클릭
account ether조금줄었지
2) Remix 테스팅 & 디버깅2
터미널에 트랜잭션 생기면 debug 버튼 클릭해서 디버깅
예제2
pragma solidity ^0.4.24;

contract MyContract {
   struct Student {
       string studentName;
       string gender;
       uint age;
   }

   mapping(uint256 => Student) studentInfo;

   function setStudentInfo(uint _studentId, string _name, string _gender, uint _age) public {
       Student storage student = studentInfo[_studentId];

       student.studentName = _name;
       student.gender = _gender;
       student.age = _age;
   }

   function getStudentInfo(uint256 _studentId) public view returns (string, string, uint) {
       return (studentInfo[_studentId].studentName, studentInfo[_studentId].gender, studentInfo[_studentId].age);
   }
}
배포해서 인자 넣어보고~~ 디버깅해보고~~
3) 가스란?
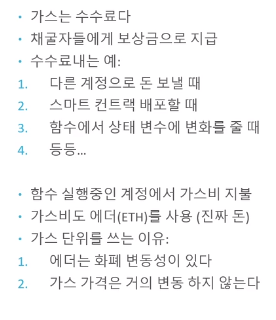
트랜잭션의 유효성을 검사
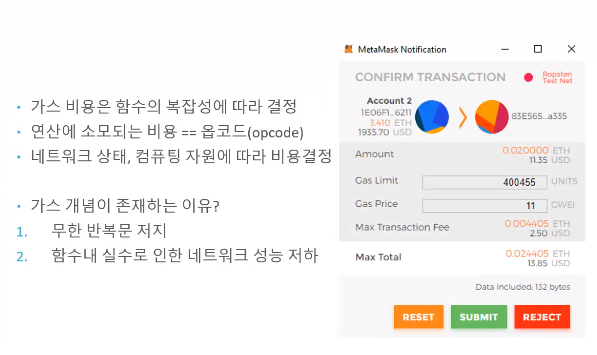
gas price : 트랜잭션 끝내기 위해 채굴자에게 시간당 지불하는 임금과 같다 gwei 단위로 지불
ETH Gas Station
EGS Garage with Chaz #2: Anyone can learn Solidity Welcome back to EGS Garage with Chaz If you read the first installment of EGS Garage with Chaz, you know we’re here to create a DApp from scratch. Much like cooking from scratch, you’re going to need a few
ethgasstation.info
네트워크에서 트랜잭션 처리하는 가스 평균 가격 확인 가능
가스 가격 더 높게 책정하면 채굴자들이 내 트랜잭션 먼저 선택해서 채굴
gas limit * gas price = max transaction fee
급하면 가스 가격 높게 해서 처리하기도 함
gwei가 ether로 얼마인지 그런거 변환~~
모든 트랜잭션 기록하는 사이트
ropsten.etherscan.io
gas limit * gas price (gwei에서 ehter로 바꾸기) = 수수료
etherscan에서 gas used by txn * gas price = 실제 수수료
TESTNET Ropsten (ETH) Blockchain Explorer
ropsten.etherscan.io
4) 옵코드(OpCodes)
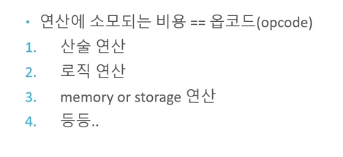
compile - detail - BYTECODE - object복사 - https://etherscan.io/opcode-tool 에서 opcode로 변환
0x 붙이고 복붙
그러면 detail의 opcodes랑 똑같아
opcodes를 여기서 해독가능
https://ethereum.stackexchange.com/questions/119/what-opcodes-are-available-for-the-ethereum-evm
What OPCODES are available for the Ethereum EVM?
The Ethereum virtual machine has a large number of operation codes and base level instruction sets. Is a complete listing available?
ethereum.stackexchange.com
옵코드 종류
opcode마다 소량의 가스 소모
** 이더리움 가상머신에서 컨트랙에 배포됐을때 옵코드를 스택에 먼저 쌓고
해당 트랜잭션이 있을때마다 필요한 옵코드 읽으며 실행시킨다 **
5) 컨트랙 최적화 1
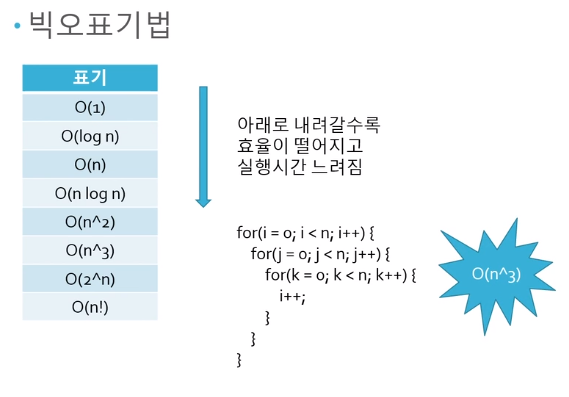
이것보다 중요한 것이 GAS!!!!!!!!!!!!!!!!!!!!!!!!!
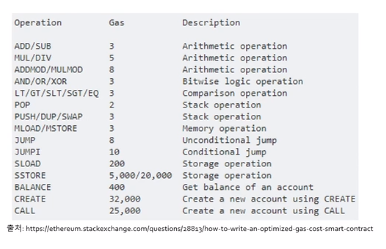
많이 쓰이는 옵코드
가스 어떻게 하면 줄일 수 있을까를 생각하기.
1. 컨트랙 배포할 때의 비용 - 처음에 옵코드화 할 때 가스 소모
주석 변수이름 타입이름은 가스 소모 x
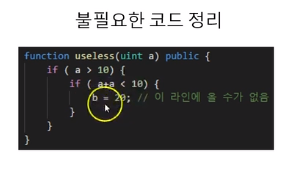
2. 컨트랙 내의 함수를 불러올 때의 비용
pure view는 수수료 x


상태 변수 total은 storage (상태변수는 default가 stroage)
storage는 연산 비용 비싸
total += 2 할 때마다 비용 개비싼 것,,
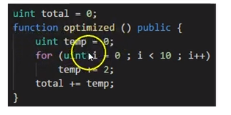
로컬 변수 생성하는 것! (되게 비효율적이다.... 개발자에게...)
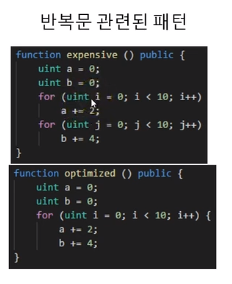
문자를 변수에 저장할 때 string대신 bytes32 쓰기
string은 동적이라 가스비 많이 나감
이더 가상머신은 bytes32에 최적화 되어있다
256bit = 32byte
<정리>

6) 컨트랙 최적화 2
반복문은 길이 50 이하를 돌릴 때 효율적
그것을 넘을 땐 mapping을 대신쓰기
솔리디티는 가스땜에 반복문 계속 돌리는거 안좋아 셧다운돼
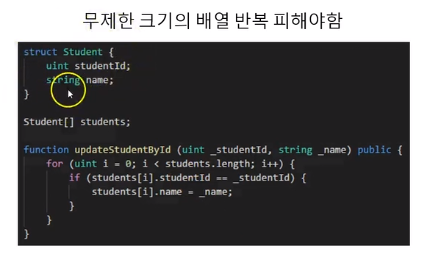
이 배열에 학생 몇만명이 있다고 가정
이렇게 하면 비효율적이겠지. mapping을 쓰자!
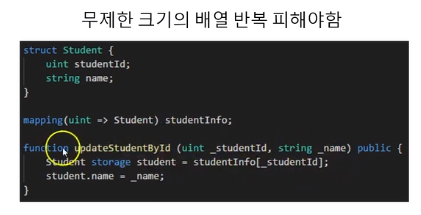
그렇다고 모든 것을 매핑하는 것은 안좋고
데이터길이 크지 않으면 배열쓰고
크면 매핑 쓰고!
7) 트러플 & 컨트랙 배포 1 (구조 설명, 배포)
개발 속도를 높여주는 트러플
PS C:\Users\user> cd .\Blockchain3\
PS C:\Users\user\Blockchain3> mkdir -p truffle


    디렉터리: C:\Users\user\Blockchain3


Mode                LastWriteTime         Length Name
----                -------------         ------ ----
d-----     2019-05-30  오후 12:41                truffle


PS C:\Users\user\Blockchain3> cd .\truffle\
PS C:\Users\user\Blockchain3\truffle> truffle init
Downloading...
Unpacking...
Setting up...
Unbox successful. Sweet!

Commands:

  Compile:        truffle compile
  Migrate:        truffle migrate
  Test contracts: truffle test
PS C:\Users\user\Blockchain3\truffle> code .
- contracts 폴더 : 솔리디티 컨트랙 보관
컨트랙 배포 할때 migrations 폴더 안에있는 스크립트 파일 실행시킨다
- 스크립트 파일 : 배포할때쓰이는 로직 담겨있음 1_ 다른스크립트파일생성할때 순차적으로 숫자 붙이기 순차적으로 실행하기 때문 숫자따라
이 스크립트파일이 컨트랙(sol 파일)을 노드에 배포하는 역할 한다
- test 폴더 : 컨트랙 테스트할때
- truffle.js 환경설정 어느 네트워크에 배포할지
truffle-config는 위랑 똑같음. 윈도우에서 cmd이용하는사람때문
truffle.js 인식못해서 -config 붙여서 똑같이 만든거.
파워셀에서는 문제없음
-config 지워
근데 난 truffle-config.js만 있음
contract 폴더에 MyContract.sol 만들기
pragma solidity ^0.4.24;

contract MyContract {
   struct Student {
       string studentName;
       string gender;
       uint age;
   }

   mapping(uint256 => Student) studentInfo;

   function setStudentInfo(uint _studentId, string _name, string _gender, uint _age) public {
       Student storage student = studentInfo[_studentId];

       student.studentName = _name;
       student.gender = _gender;
       student.age = _age;
   }

   function getStudentInfo(uint256 _studentId) public view returns (string, string, uint) {
       return (studentInfo[_studentId].studentName, studentInfo[_studentId].gender, studentInfo[_studentId].age);
   }
}
migrations 폴더에 2_deploy_contract.js 만들고
// mycontract 불러오고 노드 배포
const MyContract = artifacts.require("./MyContract.sol");

module.exports = function(deployer) {
  deployer.deploy(MyContract); // 이더리움 가상머신에 배포
};
MyContract 배포해볼게
파워쉘1
PS C:\Users\user> cd .\Blockchain3\truffle\
PS C:\Users\user\Blockchain3\truffle> truffle develop
Truffle Develop started at http://127.0.0.1:9545/

Accounts:
(0) 0x627306090abab3a6e1400e9345bc60c78a8bef57
(1) 0xf17f52151ebef6c7334fad080c5704d77216b732
(2) 0xc5fdf4076b8f3a5357c5e395ab970b5b54098fef
(3) 0x821aea9a577a9b44299b9c15c88cf3087f3b5544
(4) 0x0d1d4e623d10f9fba5db95830f7d3839406c6af2
(5) 0x2932b7a2355d6fecc4b5c0b6bd44cc31df247a2e
(6) 0x2191ef87e392377ec08e7c08eb105ef5448eced5
(7) 0x0f4f2ac550a1b4e2280d04c21cea7ebd822934b5
(8) 0x6330a553fc93768f612722bb8c2ec78ac90b3bbc
(9) 0x5aeda56215b167893e80b4fe645ba6d5bab767de

Private Keys:
(0) c87509a1c067bbde78beb793e6fa76530b6382a4c0241e5e4a9ec0a0f44dc0d3
(1) ae6ae8e5ccbfb04590405997ee2d52d2b330726137b875053c36d94e974d162f
(2) 0dbbe8e4ae425a6d2687f1a7e3ba17bc98c673636790f1b8ad91193c05875ef1
(3) c88b703fb08cbea894b6aeff5a544fb92e78a18e19814cd85da83b71f772aa6c
(4) 388c684f0ba1ef5017716adb5d21a053ea8e90277d0868337519f97bede61418
(5) 659cbb0e2411a44db63778987b1e22153c086a95eb6b18bdf89de078917abc63
(6) 82d052c865f5763aad42add438569276c00d3d88a2d062d36b2bae914d58b8c8
(7) aa3680d5d48a8283413f7a108367c7299ca73f553735860a87b08f39395618b7
(8) 0f62d96d6675f32685bbdb8ac13cda7c23436f63efbb9d07700d8669ff12b7c4
(9) 8d5366123cb560bb606379f90a0bfd4769eecc0557f1b362dcae9012b548b1e5

Mnemonic: candy maple cake sugar pudding cream honey rich smooth crumble sweet treat

⚠️  Important ⚠️  : This mnemonic was created for you by Truffle. It is not secure.
Ensure you do not use it on production blockchains, or else you risk losing funds.

truffle(develop)>
트러플 내부에서 이더리움 노드 실행, 테스트 계정 10개 생성
트러플 자바스크립트콘솔 실행시킴
파워쉘 하나 더 켜서 혀냐재 트러플에서 돌고있는 노드의 로그상태볼거야
파월쉘2
PS C:\Users\user\Blockchain3\truffle> truffle develop --log
Connected to existing Truffle Develop session at http://127.0.0.1:9545/
파워쉘1
truffle(develop)> migrate
Compiling .\contracts\Migrations.sol...
Compiling .\contracts\MyContract.sol...
Writing artifacts to .\build\contracts

Using network 'develop'.

Running migration: 1_initial_migration.js
  Deploying Migrations...
  ... 0x18f1bcb5a558aa3b253d7655bcb8bace5e6c04eb190f5799a938142e6d25551b
  Migrations: 0x8cdaf0cd259887258bc13a92c0a6da92698644c0
Saving artifacts...
Running migration: 2_deploy_contracts.js
  Deploying MyContract...
  ... 0x798246c413dcb70958d025385624162ef793c4f0913728b6c2dc74ac603c075e
  MyContract: 0xf12b5dd4ead5f743c6baa640b0216200e89b60da
Saving artifacts...
truffle(develop)>
배포하면서 생긴 트랜잭션 해쉬 (... 이부분)
migrations ~~~ : 이 컨트랙이 네트워크 어느주소로 배포됐는지 알려준다
파워쉘2에서 로그찍힌거 볼 수 있어

주소 일치
나머지 두 트랜잭션
mgirate 하면서 두개의 스크립트 실행시켰잖아
alst_com~ 이게 2로 업데이트 된다 나중에 migrate 해도 기존으 ㅣ 컨트랙 재배포 하지 않는다?
근데 나는 또 된다.... network up to date가 떠야하는데,,,,
last_com~ 이게 2여야 하는데...... 뭐지..... 9분 30초
가스비용절감 & 기존 컨트랙 다른 주소에 또 배포안하기 위한 장치
기존 컨트랙 수정하면 수정 불가능 해서 아예 새로운 주소로 배포해야 한다.
그럴때마다 사용하는 커맨드
truffle(develop)> migrate --compile-all --reset모든 컨트랙 다시 컴파일 & 마이그레이션 폴더 안에잇는 슼립트 강제적으로 실행 시킴
다시 배포됨~~!! migraet하면 build라는 폴더 생성됨 거기 안에 contracts폴더 아티팩트
각각의 아티팩트 파일은 해당 컨트랙의 abi 정보와 컨트랙관련정보 다 담고있다
application binary interfacce
컨트랙과 상호작용할수있는 방법 정의한 곳
"networks" "숫자"
truffle develop 에서 생성한 id
8) 트러플 & 컨트랙 배포 2 (트러플 콘솔 사용)
web3 api 이용! (트러플에서도 제공해~)
truffle(develop)> web3.eth.accounts
[
  '0x627306090abab3a6e1400e9345bc60c78a8bef57',
  '0xf17f52151ebef6c7334fad080c5704d77216b732',
  '0xc5fdf4076b8f3a5357c5e395ab970b5b54098fef',
  '0x821aea9a577a9b44299b9c15c88cf3087f3b5544',
  '0x0d1d4e623d10f9fba5db95830f7d3839406c6af2',
  '0x2932b7a2355d6fecc4b5c0b6bd44cc31df247a2e',
  '0x2191ef87e392377ec08e7c08eb105ef5448eced5',
  '0x0f4f2ac550a1b4e2280d04c21cea7ebd822934b5',
  '0x6330a553fc93768f612722bb8c2ec78ac90b3bbc',
  '0x5aeda56215b167893e80b4fe645ba6d5bab767de'
]
테스팅하는 계정들 확인가능 첫번째 계정은 배포하느라 좀 깎여있을거야
truffle(develop)> web3.fromWei(web3.eth.getBalance(web3.eth.accounts[0]), "ether")
BigNumber { s: 1, e: 1, c: [ 99, 73506680000000 ] }
우리가 원하는 숫자로 보자!
truffle(develop)> web3.fromWei(web3.eth.getBalance(web3.eth.accounts[0]), "ether").toNumber()
99.7350668
truffle(develop)> web3.fromWei(web3.eth.getBalance(web3.eth.accounts[1]), "ether").toNumber()
100
MyContract 불러오고 그 안 함수 써볼거야
전역변수에 마이컨트랙트 인스턴스 저장해야해
배포 되었으면 뭘 하라 then! 트러플로부터 마이컨트랙의 인스턴스를 콜백을 ㅗ받는데 이걸 전역변수 app에 대입
truffle(develop)> MyContract.deployed().then(function(instance) { app = instance; })
undefined
대입 잘된거
이제 이 app 변수를 통해 노드에 배포된 우리의 MyContraact 과 소통 가능!
app이 어떤변수 지니고있나 보자
그냥 app 치면됨
set 함수이용해 트러플 노드에 학생 정보를 입력해보자
마지막 매개변수는 트러플내부에서 인식하는 파라미터인데, set쓸때ㅔ 어느 계정을 ㅗ불러와서 쓰는건지 명시해줘야해!! 무조건!!
truffle(develop)> app.setStudentInfo(1111, "dahee", "female", 22, {from: web3.eth.accounts[1]})
{
  tx: '0xfe4f49ba7dce8dd3801e2b878291f1c4c926a73c165da594ebbf835d8733ebcb',
  receipt: {
    transactionHash: '0xfe4f49ba7dce8dd3801e2b878291f1c4c926a73c165da594ebbf835d8733ebcb',
    transactionIndex: 0,
    blockHash: '0xdd4db48deb2c25152df2adcc3753cb7fb2263026fa6f5e654276443bf02fc9e8',
    blockNumber: 9,
    gasUsed: 85300,
    cumulativeGasUsed: 85300,
    contractAddress: null,
    logs: [],
    status: '0x1',
    logsBloom: '0x00000000000000000000000000000000000000000000000000000000000000000000000000000000000000000000000000000000000000000000000000000000000000000000000000000000000000000000000000000000000000000000000000000000000000000000000000000000000000000000000000000000000000000000000000000000000000000000000000000000000000000000000000000000000000000000000000000000000000000000000000000000000000000000000000000000000000000000000000000000000000000000000000000000000000000000000000000000000000000000000000000000000000000000000000000000'
  },
  logs: []
}
트랜잭션 성공! receipt 영수증을 받았다!
파워쉘2를 보면 트랜잭션 생성되어있음
이제 두번째 계정 잔액 보자. 뭔지 알지? 좀 줄어있을거야
이제 입력한 데이터 불러와보자
truffle(develop)> app.getStudentInfo(1111)
[ 'dahee', 'female', BigNumber { s: 1, e: 1, c: [ 22 ] } ]
이건 view타입이라 트랜잭션 생기지도 않고 가스비도 지불하지 않는다.
테스팅하기 아주 좋은 환경을 제공하는 truffle!
truffle develop하면 truffle(develop)> 됨
.exit하면 나갈 수 있음
log봤던 파워쉘2 는 ctrl c 2번 & y 누르면 나갈 수 있음
9) 트러플 & 컨트랙 배포 3 (가나슈 사용)
가나슈는 눈으로 보기 편해 스마트컨트랙 테스팅 하기 좋아 트러플과 같이 쓰면 더 좋아
트러플에서 가나슈 네트워크에 연결하자! 가나슈 켜고
truffle.js에서 환경설정 좀 해줘야 해
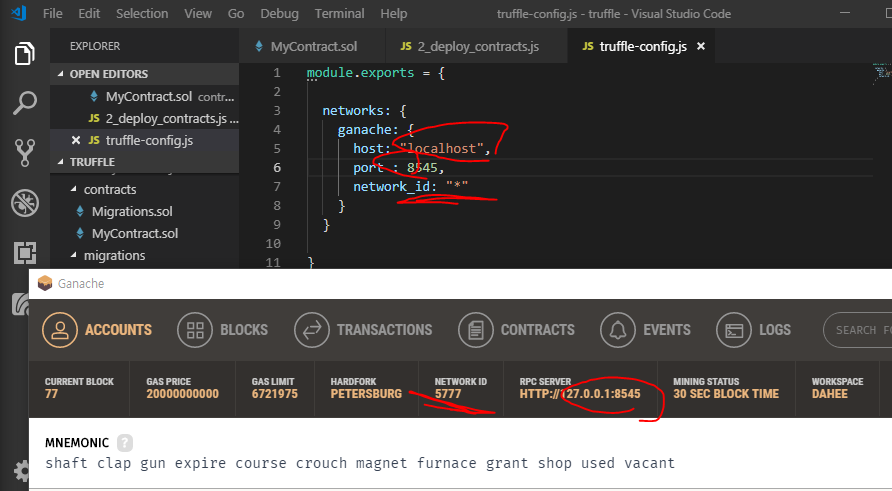
module.exports = {

  networks: {
    ganache: {
      host: "localhost",
      port : 8545,
      network_id: "*"
    }
  }

}
이제 컨트랙을 가나슈 노드에 배포해볼게
트러플 콘솔 접속하지 않은 상태에서!!!
컨트랙 재컴파일 시키면서 새로운 주소에 컨트랙 배포!
build - contract 폴더 안에있는 아티팩트가 업데이트 되겠지! MyContract.json
network 5777 새로 생겼지!!
가나슈 노드에 컨트랙 배포하면서 첫번째 coinbase 계정이 디폴트로 쓰였지 가스비 조금 지불했어
트랜잭션 탭으로 가면 배포하면서 생긴 트랜잭션 볼 수있어. 컨트랙 creations 두개의 배포하면서 생긴 트랜잭션
call은 migrations 컨트랙에 last_com~ 이 값을 업데이트하면서 쓰인 트랜잭션
truffle 콘솔 접속해서 가나슈에 배포된 컨트랙과 소통해볼게
가나슈 네트워크와 연결한다고 명시해줘야해 그리고 set해보면 두번째 계정 잔액 좀 줄었지
PS C:\Users\user\Blockchain3\truffle> truffle console --network ganache
truffle(ganache)> MyContract.deployed().then(function(instance) { app = instance; })
undefined
truffle(ganache)> app.setStudentInfo(1111, "dahee", "female", 22, {from: web3.eth.accounts[1]})
{
  tx: '0x791b9399c41769ff85aaa9f3abcdef7760f48d3941b8a848459f5d283c8d8992',
  receipt: {
    transactionHash: '0x791b9399c41769ff85aaa9f3abcdef7760f48d3941b8a848459f5d283c8d8992',
    transactionIndex: 0,
    blockHash: '0x75b831681792728f4b9f1a48a3b04a13bd1d8f009c946d7da9458f8d188971c8',
    blockNumber: 90,
    from: '0x2dcca9b61e50d79a90a813fcd6a42c3a3ac52e6f',
    to: '0x62ae6684fdeebc4f871cb527cc8682b2051240fc',
    gasUsed: 85300,
    cumulativeGasUsed: 85300,
    contractAddress: null,
    logs: [],
    status: '0x1',
    logsBloom: '0x00000000000000000000000000000000000000000000000000000000000000000000000000000000000000000000000000000000000000000000000000000000000000000000000000000000000000000000000000000000000000000000000000000000000000000000000000000000000000000000000000000000000000000000000000000000000000000000000000000000000000000000000000000000000000000000000000000000000000000000000000000000000000000000000000000000000000000000000000000000000000000000000000000000000000000000000000000000000000000000000000000000000000000000000000000000',
    v: '0x1c',
    r: '0x98a1a60971483abf628272231d570ca132260c50b757ffb6599a042e46b15da7',
    s: '0x6d43424ab260c97cddfdbbc06a44311e244ae0b532f3bc4974429a2c640ec7'
  },
  logs: []
}
트랜잭션 탭 가보면 트랜잭션 caall 생김 가스 이만큼 썼다 볼 수 있음

truffle(ganache)> app.getStudentInfo(1111)
[ 'dahee', 'female', BigNumber { s: 1, e: 1, c: [ 22 ] } ]
가나슈 인터페이스 이용해 직관적으로 테스팅 가능
트러플 콘솔을 통해 스마트 컨트랙과 소통가능!
가나슈와 이용하면 인터페이스 굿
트러플 콘솔보다 사용자 친화적인 가나슈!
[[[[[[[[[[[[[[[[[[[[[truffle.js (나는 이거 생성 안되고 truffle-config.js만 생성돼서 truffle.js로 이름 바꿔서 씀 여기에 씀. 둘이 같은건데
강의에선 둘다생성되고 강의자는 truffle-config를 삭제했음)
MyContract.json에 영어주석 있었더니
PS C:\Users\user\Blockchain\truffle> truffle migrate --compile-all --reset --network ganache
이게 안먹혔음
주의!
새로운 networkid생김
MyContract.json
ganache transaction 탭에서 배포한 트랜잭션 볼 수 있다 - contract creation
근데 last 어쩌구는 안생김...]]]]]]]]]]]]]]
5. 이더리움 부동산 스마트 계약 개발
1) 부동산 DAPP 미리보기 및 주의점
꼭 필요한 내용만 블록체인에 저장한다. - 저장 자체가 비용이기 때문
기타는 기존의 데이터베이스 사용 (MySql)
매물 리스트는 블록체인에서 불러오는 것이 아님.
데이터 저장 속도는 블록체인이 느림
"정말 중요한 정보만 블록체인에 저장한다."
기존 데이터베이스와 mix 하기 블록체인만 고집 x
2) 스타터 템플렛 받기
댑개발에 필요한 정형화된 표준 템플릿 다운!
javascript와 jquery 이용한 템플릿 쓸거야
https://truffleframework.com/boxes
Truffle Suite | Boxes
Truffle Boxes contain helpful modules for dapp development like, Solidity contracts & libraries, front-end views all the way up to complete dapp examples and templates.
www.truffleframework.com
PS C:\Users\user\Blockchain3\truffle> cd ..
PS C:\Users\user\Blockchain3> mkdir -p real-estate


    디렉터리: C:\Users\user\Blockchain3


Mode                LastWriteTime         Length Name
----                -------------         ------ ----
d-----     2019-05-30   오후 2:52                real-estate


PS C:\Users\user\Blockchain3> cd .\real-estate\
PS C:\Users\user\Blockchain3\real-estate> truffle unbox kkagill/real-estate-starter
그런데 이거 안돼서 그냥 강의에 첨부한 파일 다운로드 받음
real-estate.json에 매물 정보 있음
bs-config.json : 댑 돌릴때 라이트서버 돌릴때 필욯ㄴ
package.json 라이트서버 설치 기타모듈 npm으로 설치할때 필요한 파일
truffle.js 트러플 환경설정
3) 컨트랙 소유자 설정
컨트랙의 생성자는 시작 시 한 번만 호출되고 그 다음에 호출 불가 그 장점을 이용해 컨트랙 소유자 설정
상태변수에 public 만들면 owner의 getter setter 자동 생성됨
가나슈 노드에 방금 만든 노드 컨트랙 배포해볼거야
RealEstate.sol
pragma solidity ^0.4.23;

contract RealEstate {
    address public owner; // public으로 만들면 getter 자동으로 생김

    constructor() public {
        owner = msg.sender;
    }
}
RealEstate 컨트랙을 배포할거야
PS C:\Users\user\Blockchain\real-estate> truffle migrate --network ganache

PS C:\Users\user\Blockchain\real-estate> truffle console --network ganache


PS C:\Users\user\Blockchain\real-estate> truffle console --network ganache
truffle(ganache)> RealEstate.deployed().then(function(instance) { app = instance; })
undefined
truffle(ganache)> app.owner.call()
'0x20bb5789f444e47a88c366f0bfe41ecb3c75bd4c'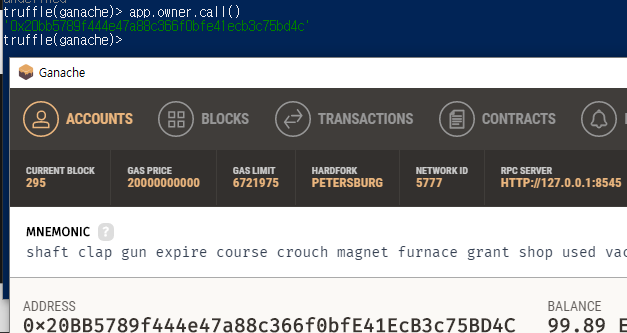
가나슈 첫 번째 계정이 owner가 됨
돈을 이 계정으로 보낼거야~~
"내가 사용하고 싶은 계정으로 언제든지 컨트랙의 소유자로 설정할수있다"???
4) 첫 테스팅
배포하면 수정하는게 불가능해서 테스트 많하고 메인넷에 배포하긔
test 폴더 안에 TestRealEstate
truffle은 모카테스팅프레임워크
어서션은 차일을 사용한다
이미 검증된 테스팅프레임워크사용
TestRealEstate.js
var RealEstate = artifacts.require("./RealEstate.sol");

contract('RealEstate', function(accounts) {
    // 테스팅할 컨트랙트, accounts를 콜백으로 받는다
    // accounts : 현재 연결된 노드에서 쓸수있는 계정 가나슈에서 연결할거져!! 그 계정!~
    var realEstateInstance;

    it("컨트랙의 소유자 초기화 테스팅", function() { // 무슨 테스트 할건지 : it
        return RealEstate.deployed().then(function(instance) { // 배포가 됐다면
            realEstateInstance = instance;
            return realEstateInstance.owner.call(); // owner return
        }).then(function(owner) {
            assert.equal(owner.toUpperCase(), accounts[0].toUpperCase(), "owner가 가나슈 첫 번째 계정과 일치하지 않습니다.");
            // assert.equal(리턴된 실제 값, 예상값, 두 개가 다를 경우 에러메시지)
        });
    });
});
powershell
PS C:\Users\user\Blockchain\real-estate> truffle test --network ganache
Using network 'ganache'.


  Contract: RealEstate
    √ 컨트랙의 소유자 초기화 테스팅 (80ms)


  1 passing (136ms)
가나슈가 실행되고 컨트랙에 배포되어있어야해
chcp 949 <------ powershell에서 한글 깨지면
테스팅 강제로 실패하도록해보기
이번엔 [0] -> [1]로! (assert 있는 코드)
그러면 에러 뜸
PS C:\Users\user\Blockchain\real-estate> truffle test --network ganache
Using network 'ganache'.


  Contract: RealEstate
    1) 컨트랙의 소유자 초기화 테스팅
    > No events were emitted


  0 passing (103ms)
  1 failing

  1) Contract: RealEstate
       컨트랙의 소유자 초기화 테스팅:

      owner가 가나슈 첫 번째 계정과 일치하지 않습니다.
      + expected - actual

      -0X20BB5789F444E47A88C366F0BFE41ECB3C75BD4C
      +0X2DCCA9B61E50D79A90A813FCD6A42C3A3AC52E6F

      at test\TestRealEstate.js:11:20
      at processTicksAndRejections (internal/process/task_queues.js:89:5)
트러플 테스팅 프레임워크를 이용한 컨트랙 테스팅! 이었습니다!
??????? 근데 왜 첫번째 계정이 주인이돼 내가 어디서 배포를 그렇게 했는데?
5) 매물구입 함수
RealEstate.sol
pragma solidity ^0.4.23;

contract RealEstate {
    struct Buyer {
        address buyerAddress; // 매입자의 계정 주소
        bytes32 name;
        uint age;
    }

    mapping (uint => Buyer) public buyerInfo; // 매물의 id 키값 => 매입자의 정보

    address public owner; // public으로 만들면 getter 자동으로 생김
    address[10] public buyers; // 매입자 계정 주소 저장. 매물이 10개니까 10개

    constructor() public {
        owner = msg.sender;
    }

    // 매물 id, 매입자 이름, 매입자 나이
    function buyRealEstate(uint _id, bytes32 _name, uint _age) public payable { // 이더를 이 함수로 보내는 것
        require(_id >= 0 && _id <= 9);
        buyers[_id] = msg.sender; // 이 메시지 보낸 사람이 사는거니까!
        buyerInfo[_id] = Buyer(msg.sender, _name, _age); // 매입된 매물의 매입자 정보 매핑

        owner.transfer(msg.value); // 매입가를 owner 계정으로 전송
        // 여기에는 wei만 들어가서 프론트엔드에서 ether를 wei로 변경시켜줘야함

    }
}
재컴파일. 가나슈에 재배포
PS C:\Users\user\Blockchain\real-estate> truffle migrate --compile-all --reset --network ganache

PS C:\Users\user\Blockchain\real-estate> truffle console --network ganache
truffle(ganache)> RealEstate.deployed().then(function(instance) { app = instance; })
undefined
truffle(ganache)> app.buyRealEstate(0, "dahee", 22, {from: web3.eth.accounts[1], value: web3.toWei(1.50, "ether")})
그럼 영수증 나오고 가나슈 첫번째 계정은 돈 늘어나고 두번째 계정은 돈 줄어듦
항상 wei로 변환하기
6) 이벤트
event도 블록체인에 저장됨
pragma solidity ^0.4.23;

contract RealEstate {
    struct Buyer {
        address buyerAddress; // 매입자의 계정 주소
        bytes32 name;
        uint age;
    }

    mapping (uint => Buyer) public buyerInfo; // 매물의 id 키값 => 매입자의 정보

    address public owner; // public으로 만들면 getter 자동으로 생김
    address[10] public buyers; // 매입자 계정 주소 저장. 매물이 10개니까 10개

    event LogBuyRealEstate (
        address _buyer,
        uint _id
    );

    constructor() public {
        owner = msg.sender;
    }

    // 매물 id, 매입자 이름, 매입자 나이
    function buyRealEstate(uint _id, bytes32 _name, uint _age) public payable { // 이더를 이 함수로 보내는 것
        require(_id >= 0 && _id <= 9);
        buyers[_id] = msg.sender; // 이 메시지 보낸 사람이 사는거니까!
        buyerInfo[_id] = Buyer(msg.sender, _name, _age); // 매입된 매물의 매입자 정보 매핑

        owner.transfer(msg.value); // 매입가를 owner 계정으로 전송
        // 여기에는 wei만 들어가서 프론트엔드에서 ether를 wei로 변경시켜줘야함

        emit LogBuyRealEstate(msg.sender, _id); // 이벤트를 내보내겠다!
    }
}
event와 맨 아래 emit 코드 추가
재컴파일시 가나슈에 연결되어있어야해 다음과 같이!
truffle(ganache)> migrate --compile-all --reset

truffle(ganache)> RealEstate.deployed().then(function(instance) { app = instance; })
undefined

// 필터(모든 buyRealEstae 감지), 범위(0~ 최근생성된 블록까지 감지), 감지할수있게함 (error와 event를 받는다)
truffle(ganache)> app.LogBuyRealEstate({}, {fromBlock: 0, toBlock: 'latest'}).watch(function(error, event) { console.log(event); })
이벤트 초기화하고 이벤트 새엇ㅇ됐을때 그걸 감지할수있는코드를 쓴거야
이벤트를 추가했다는 메시지가 나온다!
이제 매물 하나 매입해서 이벤트가 잘 작동하는지 볼거야
truffle(ganache)> app.buyRealEstate(0, "dahee", 22, {from: web3.eth.accounts[1], value: web3.toWei(1.50, "ether")})
{ // 이게 console.log의 결과?
  logIndex: 0,
  transactionIndex: 0,
  transactionHash: '0xaba2ff17f8e5ec0867305d2019903afc6bcdaf16ec6b6058b7737d5dcbdd315d',
  blockHash: '0xbc6e275026f9fa9864afea8d8be1a323eba3e50a0c04374ef8c32159098e0dd5',
  blockNumber: 419,
  address: '0x527b5e352f7c3cd9cc6216decc8e0a9ee1714874',
  type: 'mined',
  event: 'LogBuyRealEstate',
  args: {
    _buyer: '0x2dcca9b61e50d79a90a813fcd6a42c3a3ac52e6f', // 오~
    _id: BigNumber { s: 1, e: 0, c: [Array] } // 오~
  }
}
{
  tx: '0xaba2ff17f8e5ec0867305d2019903afc6bcdaf16ec6b6058b7737d5dcbdd315d',
  receipt: { // 영수증
    transactionHash: '0xaba2ff17f8e5ec0867305d2019903afc6bcdaf16ec6b6058b7737d5dcbdd315d',
    transactionIndex: 0,
    blockHash: '0xbc6e275026f9fa9864afea8d8be1a323eba3e50a0c04374ef8c32159098e0dd5',
    blockNumber: 419,
    from: '0x2dcca9b61e50d79a90a813fcd6a42c3a3ac52e6f',
    to: '0x527b5e352f7c3cd9cc6216decc8e0a9ee1714874',
    gasUsed: 112255,
    cumulativeGasUsed: 112255,
    contractAddress: null,
    logs: [ [Object] ],
    status: '0x1',
    logsBloom: '0x00000000000000000000080000000000000000000000000000000000000000000000000000000000000000000000000000000000000000000000000000000000000000000000000000000000000000000000000000000001000000000000000000000000000000000000000002000000000000000000000000000000000000000000000000000000000000000000400000000000000000000000000000000000000000000000000000000040000000000000000000000000000000000000000000000000000000000000000000000000000000000000000000000000000000000000000000000000000000000008000000000000000000000000000000000000',
    v: '0x1c',
    r: '0x2516945c24774506a17549993a77b188ccfb914d6318f419557e3c01b5a3e64c',
    s: '0x6108b7ea8dd5c27d72d1a69a6f89460ccc3f837265e81ea6a7847315f0d006b1'
  },
  logs: [ // 예전에 없었던 필드 생김 logs : 트랜잭션에 발산된 모든 이벤트 정보를 담고있음
    {
      logIndex: 0,
      transactionIndex: 0,
      transactionHash: '0xaba2ff17f8e5ec0867305d2019903afc6bcdaf16ec6b6058b7737d5dcbdd315d',
      blockHash: '0xbc6e275026f9fa9864afea8d8be1a323eba3e50a0c04374ef8c32159098e0dd5',
      blockNumber: 419,
      address: '0x527b5e352f7c3cd9cc6216decc8e0a9ee1714874',
      type: 'mined',
      event: 'LogBuyRealEstate',
      args: [Object]
    }
  ]
}
logs가 새로 생겼지 console.log의 결과??/ 라는데
블록에 이런걸 저장한거래
args의 정보를 이용해 사용자에게 이벤트 띄울 수 있음
event가 블록 log 부분에 저장된다!!! (7분)
7) 읽기전용 함수들
상태변수의 데이터 불러온다
	function getBuyerInfo(uint _id) public view returns (address, bytes32, uint) {
        Buyer memory buyer = buyerInfo[_id]; // buyer는 휘발됨
        return (buyer.buyerAddress, buyer.name, buyer.age);
    }

    function getAllBuyers() public view returns (address[10]) {
        return buyers;
    }
추가
재컴파일, 재배포
truffle(ganache)> migrate --compile-all --reset
truffle(ganache)> RealEstate.deployed().then(function(instance) { app = instance; })
undefined
truffle(ganache)> app.buyRealEstate(0, "dahee", 22, {from: web3.eth.accounts[1], value: web3.toWei(1.50, "ether")})
{
  tx: '0x9994afd55214742c0ab3d98e017f31b61135e33f6e0af2babf399052ca636dc2',
  receipt: {
    transactionHash: '0x9994afd55214742c0ab3d98e017f31b61135e33f6e0af2babf399052ca636dc2',
    transactionIndex: 0,
    blockHash: '0xe3b7f38122e894143e0152cc4b5897db95f7edd9c452290314dc54c3522fb661',
    blockNumber: 448,
    from: '0x2dcca9b61e50d79a90a813fcd6a42c3a3ac52e6f',
    to: '0x5472d2da139bbe8d13059a4ce08c9fd9be4897f6',
    gasUsed: 112255,
    cumulativeGasUsed: 112255,
    contractAddress: null,
    logs: [ [Object] ],
    status: '0x1',
    logsBloom: '0x00000000000000000080080000000000000000000000000000000000000000000000000000000020000020000000000000000000000000000000000000000000000000000000000000000000000000000000000000000000000000000000000000000000000000000000000002000000000000000000000000000000000000000000000000000000000000000000000000000000000000000000000000000000000000000000000000000000000000000000000000000000000000000000000000000000000000000000000000000000000000000000000000000000000000000000000000000000000000000008000000000000000000000000000000000000',
    v: '0x1b',
    r: '0xf2b63a18452813a259ba464c470c6d4c820df2c93052f955c100beb6eecf4a28',
    s: '0x5cc5f440c6279ef2cf2f47bff3c1b6d2c2c29580880b733ba80361c22d131e7e'
  },
  logs: [
    {
      logIndex: 0,
      transactionIndex: 0,
      transactionHash: '0x9994afd55214742c0ab3d98e017f31b61135e33f6e0af2babf399052ca636dc2',
      blockHash: '0xe3b7f38122e894143e0152cc4b5897db95f7edd9c452290314dc54c3522fb661',
      blockNumber: 448,
      address: '0x5472d2da139bbe8d13059a4ce08c9fd9be4897f6',
      type: 'mined',
      event: 'LogBuyRealEstate',
      args: [Object]
    }
  ]
}
truffle(ganache)> app.getBuyerInfo(0);
[
  '0x2dcca9b61e50d79a90a813fcd6a42c3a3ac52e6f',
  '0x6461686565000000000000000000000000000000000000000000000000000000', // bytes32라 그래
  BigNumber { s: 1, e: 1, c: [ 22 ] }
]
truffle(ganache)> app.getAllBuyers(); // 이건 가스비 안내도 돼
[
  '0x2dcca9b61e50d79a90a813fcd6a42c3a3ac52e6f', // 오!
  '0x0000000000000000000000000000000000000000',
  '0x0000000000000000000000000000000000000000',
  '0x0000000000000000000000000000000000000000',
  '0x0000000000000000000000000000000000000000',
  '0x0000000000000000000000000000000000000000',
  '0x0000000000000000000000000000000000000000',
  '0x0000000000000000000000000000000000000000',
  '0x0000000000000000000000000000000000000000',
  '0x0000000000000000000000000000000000000000'
]
8) 마무리 테스팅
여러 가지를 한 테스트 케이스에 넣을 수 있을 것을 대비
TestRealEstate.js에서 accounts[0]로 바꾸고
var RealEstate = artifacts.require("./RealEstate.sol");

contract('RealEstate', function(accounts) {
    // 테스팅할 컨트랙트, accounts를 콜백으로 받는다
    // accounts : 현재 연결된 노드에서 쓸수있는 계정 가나슈에서 연결할거져!! 그 계정!~
    var realEstateInstance;

    it("컨트랙의 소유자 초기화 테스팅", function() { // 무슨 테스트 할건지 : it
        return RealEstate.deployed().then(function(instance) { // 배포가 됐다면
            realEstateInstance = instance;
            return realEstateInstance.owner.call(); // owner return
        }).then(function(owner) {
            assert.equal(owner.toUpperCase(), accounts[0].toUpperCase(), "owner가 가나슈 첫 번째 계정과 일치하지 않습니다.");
            // assert.equal(리턴된 실제 값, 예상값, 두 개가 다를 경우 에러메시지)
        });
    });

    it("가나슈 두번째 계정으로 매물 아이디 0번 매입 후 이벤트 생성 및 매입자 정보와 buyers 배열 테스팅", function() {
        return RealEstate.deployed().then(function(instance) { // 배포되면 콜백으로 instance를 받는다
            realEstateInstance = instance; // real에 instance 대입
            return realEstateInstance.buyRealEstate(0, "wonjin", 19, {from: accounts[1], value: web3.toWei(1.50, "ether")});
        }).then(function(receipt) { // 매입 성공하면 then으로 트랜잭션 콜백으로 영수증 받겠지
            // 영수증의 logs의 길이가 1인가? (이벤트 생성됐나?)
            assert.equal(receipt.logs.length, 1, "이벤트 하나가 생성되지 않았습니다.");
            // 그 이벤트가 LogBuyRealEstate인지 확인
            assert.equal(receipt.logs[0].event, "LogBuyRealEstate", "이벤트가 LogBuyRealEstate가 아닙니다.");
            assert.equal(receipt.logs[0].args._buyer, accounts[1], "매입자가 가나슈 두번째 계정이 아닙니다.");
            assert.equal(receipt.logs[0].args._id, 0, "매물 아이디가 0이 아닙니다.");
            return realEstateInstance.getBuyerInfo(0);
        }).then(function(buyerInfo) { // 각각의 필드 올바르게 리턴하나 테스팅!
            assert.equal(buyerInfo[0].toUpperCase(), accounts[1].toUpperCase(), "매입자의 계정이 가나슈 두번째 계정과 일치하지 않습니다.");
            // buyerInfo[1] 헥스로 리턴된다. (bytes32)256bit로 변환돼서 리턴됨. string으로 변환되어야겠지! web3의 api 이용하자
            // 0000 변경되며 유니코드가 생기는데 그걸 없애줘야해 by replace
            assert.equal(web3.toAscii(buyerInfo[1]).replace(/\0/g, ''), "wonjin", "매입자의 이름이 원진이 아닙니다.");
            assert.equal(buyerInfo[2], 19, "매입자의 나이가 19이 아닙니다.");
            return realEstateInstance.getAllBuyers();
        }).then(function(buyers) { // getAllBuyers 함수 테스팅
            assert.equal(buyers[0].toUpperCase(), accounts[1].toUpperCase(), "Buyers 배열 첫번째 인덱스의 계정이 가나슈 두번째 계정과 일치하지 않습니다.");
        });
    })
});
it 두번째가 새로 쓴거. 테스팅용!
그리고 파워쉘에서
PS C:\Users\user\Blockchain\real-estate> truffle test --network ganache
Using network 'ganache'.


  Contract: RealEstate
    √ 컨트랙의 소유자 초기화 테스팅 (102ms)
    √ 가나슈 두번째 계정으로 매물 아이디 0번 매입 후 이벤트 생성 및 매입자 정보와 buyers 배열 테스팅 (29838ms)


  2 passing (30s)
그러면 저 에러메시지 안뜨면 성공임
6. 이더리움 부동산 프론트앤드 개발
1) RPC Error 해결법 미리알기
가나슈 restart할 때(100에더로 초기화) & 파워쉘에서 다시 컴파일 후 npm dev run 하면 매물구입할 때 rpc 에러 난다.
메타마스크가 헷갈려하는거야 어디 네트워크로 해야하는지
[첫번째 해결방법]
가나슈의 네트워크 아이디 바꾸기
가나슈 - server - networid바꾸고
파워쉘에서 재배포, 앱 실행 (npm run dev)
메타마스크 메인으로 갔다가 다시 localhost로 돌아오기 (새로고침)
그리고 다시 매입 해보면 잘된다.
[두번째 해결방법]
reset account (in metamask settings)
캐쉬에 쌓인 히스토리 다 삭제. 여태까지 트랜잭션 다 지우게 됨 (위험,, 그러나 간편)
내역 지워지는거 상관없으면 이걸로 해
2) 매물 템플렛 작성 및 렌더링
프론트엔드 만들어보자~
node module 설치해야돼
package.json안에 lite-server를 설치해야돼
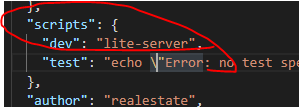
파월쉘
PS C:\Users\user\Blockchain3\real-estate> npm install노드모듈폴더가 생성되면서 안에 라이트서버 포함한 기타 댑실행에 필요한 모듈들이 다 설치됨
npm install -> 노드 라이트 서버 하기 위한거 생김 node_modules 폴더 생김
스타터템플릿으로 웬만한거 받았으니 이 두 개만 신경쓰면 돼!
app.js / index.html 수정해서 매물정보 뜨도록...!
app.js
App = {
  web3Provider: null,
  contracts: {},

  // ******이거!
  init: function() { // 데이터 불러오고 html에 매물정보 보이도록 한다.
    $.getJSON('../real-estate.json', function(data) {
      var list = $('#list');
      var template = $('#template');

      for (i = 0; i < data.length; i++) {
        template.find('img').attr('src', data[i].picture); // src 속성에 picture 값을 갖게 한다.
        template.find('.id').text(data[i].id);
        template.find('.type').text(data[i].type);
        template.find('.area').text(data[i].area);
        template.find('.price').text(data[i].price);

        list.append(template.html());
      }
    })
  },

  initWeb3: function() {

  },

  initContract: function() {

  },

  buyRealEstate: function() {

  },

  loadRealEstates: function() {

  },

  listenToEvents: function() {

  }
};

// dapp이 실행되고 페이지가 로드되면 app 안에 init 함수 먼저 실행 ******
$(function() {
  $(window).load(function() {
    App.init();
  });
});
index.html
<!DOCTYPE html>
<html lang="en">
  <head>
    <meta charset="utf-8">
    <meta http-equiv="X-UA-Compatible" content="IE=edge">
    <meta name="viewport" content="width=device-width, initial-scale=1">
    <!-- The above 3 meta tags *must* come first in the head; any other head content must come *after* these tags -->
    <title>이더리움 부동산</title>

    <!-- Bootstrap -->
    <link href="css/bootstrap.min.css" rel="stylesheet">
    <!-- HTML5 shim and Respond.js for IE8 support of HTML5 elements and media queries -->
    <!-- WARNING: Respond.js doesn't work if you view the page via file:// -->
    <!--[if lt IE 9]>
      <script src="https://oss.maxcdn.com/html5shiv/3.7.3/html5shiv.min.js"></script>
      <script src="https://oss.maxcdn.com/respond/1.4.2/respond.min.js"></script>
    <![endif]-->
  </head>
  <body>
    <div class="container">
      <div class="row">
        <div class="col-xs-12 col-sm-8 col-sm-push-2">
          <h1 class="text-center">이더리움 부동산</h1>
          <hr/>
          <br/>
        </div>
      </div>

      <div class="row" id="list">
        <!-- 매물 리스트 -->
      </div>
    </div>

    <div id="template" style="display: none;">
      <div class="col-sm-6 col-md-4 col-lg-3">
        <div class="panel panel-success panel-realEstate">
          <div class="panel-heading">
            <h3 class="panel-title">매물</h3>
          </div>
          <div class="panel-body">
            <!-- 매물 정보 -->
            <img style="width: 100%;" src="" >
            <br/><br/>
            <strong>아이디</strong>: <span class="id"></span><br/>
            <strong>종류</strong>: <span class="type"></span><br/>
            <strong>면적(m²)</strong>: <span class="area"></span><br/>
            <strong>가격(ETH)</strong>: <span class="price"></span><br/><br/>

            <!-- 매입 버튼 -->
            <button class="btn btn-info btn-buy"
                    type="button"
                    data-toggle="modal"
                    data-target="#buyModal">
                    매입
            </button>

            <!-- 매입 완료하면 매입자 정보 볼 수 있다 -->
            <button class="btn btn-info btn-buyerInfo"
                    type="button"
                    data-toggle="modal"
                    data-target="#buyerInfoModal"
                    style="display: none;"> <!-- 현재는 none으로 해놓아서 안보임 -->
                    매입자 정보
            </button>
          </div>
        </div>
      </div>
    </div>

    <!-- jQuery (necessary for Bootstrap's JavaScript plugins) -->
    <script src="https://ajax.googleapis.com/ajax/libs/jquery/1.12.4/jquery.min.js"></script>
    <!-- Include all compiled plugins (below), or include individual files as needed -->
    <script src="js/bootstrap.min.js"></script>
    <script src="js/web3.min.js"></script>
    <script src="js/truffle-contract.js"></script>
    <script src="js/app.js"></script>
    <script src="js/utf8.js"></script>
  </body>
</html>
PS C:\Users\user\Blockchain3\real-estate> npm run dev라이트서버 통해 실행시키는 것
3) Web3 & 컨트랙 인스턴스화
js 폴더 안에 web3.min.js : 이더리움 블록체인과 소통할수있게해주는 라이브러리
truffle 콘솔에서 web썼잖아 그거랑 똑같
스마트컨트랙과 연결해줄수있는 엄청나게 중요한 파일
web3를 댑에섯 쓸수있도록 인스턴스화시키는 작업 필요
initWeb3가 그것
App = {
  web3Provider: null,
  contracts: {},

  // ******이거!
  init: function() { // 데이터 불러오고 html에 매물정보 보이도록 한다.
    $.getJSON('../real-estate.json', function(data) {
      var list = $('#list');
      var template = $('#template');

      for (i = 0; i < data.length; i++) {
        template.find('img').attr('src', data[i].picture); // src 속성에 picture 값을 갖게 한다.
        template.find('.id').text(data[i].id);
        template.find('.type').text(data[i].type);
        template.find('.area').text(data[i].area);
        template.find('.price').text(data[i].price);

        list.append(template.html());
      }
    })

    return
  },

  initWeb3: function() {
    // dapp에 web3 인스턴스가 이미 활성화되어있는지 체크

    if (typeof web3 !== 'undefined') {
      // 브라우저에 메타마스크가 설치되어있다면
      // 주입된 web3 인스턴스가 존재하면
      // 메타마스크의 web3 인스턴스를 브라우저에 주입시키기 때문
      App.web3Provider = web3.currentProvider; // 공급자를 불러와
      web3 = new Web3(web3.currentProvider); // 그 공급자의 정보를 바탕으로 다시 우리 댑에서 쓸수있는 웹3 오브젝트를 만든다.
    }
    else { // typeof web3 == 'undefined'
      // 브라우저에 메타마스크가 설치 x
      // 주입된 web3 인스턴스 존재하지 않는다면
      App.web3Provider = new web3.providers.HttpProvider('http://localhost:8545'); // 로컬 공급자의 rpc 서버에 연결해서 공급자의 정보 가져오고 대입해라.
      web3 = new Web3(App.web3Provider); // 가나슈면 로컬호스트가 가나슈가 되는거야

    }

    return App.initContract();

    // 이제 dapp에서 이더리움 블록체인과 소통할 수 있게 되었다.
  },

  // 우리가 만든 스마트컨트랙을 인스턴스화시킨다.
  // 그래야 web3가 우리 컨트랙을 어디서 찾고 어떻게 작동하는지 알 수 있다.
  // 이 작업 편하게 하기 위해 truffle에서 라이브러리 제공 -> js 폴더의 truffle-contract.js
  initContract: function() {
		$.getJSON('RealEstate.json', function(data) {
      // 아티팩 파일은 abi 정보와 컨트랙 배포된 주소 가지고 있다. RealEstate.json
      // 아티팩 파일에 있는 데이터를 TruffleContract에서 제공하는 라이브러리 TruffleContract를 넘겨서 컨트랙을 인스턴스화 시킨다.
      App.contracts.RealEstate = TruffleContract(data);
      // 컨트랙의 공급자 설정
      App.contracts.RealEstate.setProvider(App.web3Provider);

    })
  },

  buyRealEstate: function() {

  },

  loadRealEstates: function() {

  },

  listenToEvents: function() {

  }
};

// dapp이 실행되고 페이지가 로드되면 app 안에 init 함수 먼저 실행 ******
$(function() {
  $(window).load(function() {
    App.init();
  });
});
4) 매입자 정보 모달 및 데이터 전달 & 5) 컨트랙 매물구입함수 연결
부트스트랩의 모달 이용할거임
https://bootstrapdocs.com/v3.3.6/docs/javascript/#modals
JavaScript · Bootstrap 3.3.6 Documentation - BootstrapDocs
Raw denim you probably haven't heard of them jean shorts Austin. Nesciunt tofu stumptown aliqua, retro synth master cleanse. Mustache cliche tempor, williamsburg carles vegan helvetica. Reprehenderit butcher retro keffiyeh dreamcatcher synth. Cosby sweater
bootstrapdocs.com
index.html
모달 추가 부트스트랩 그대로 긁어오고 몇부분만 추가. buyModal *** 주목!
그리고 파워쉘에서 npm run dev
<!DOCTYPE html>
<html lang="en">
<head>
<meta charset="utf-8">
<meta http-equiv="X-UA-Compatible" content="IE=edge">
<meta name="viewport" content="width=device-width, initial-scale=1">
<!-- The above 3 meta tags *must* come first in the head; any other head content must come *after* these tags -->
<title>이더리움 부동산</title>
<!-- Bootstrap -->
<link href="css/bootstrap.min.css" rel="stylesheet">
<!-- HTML5 shim and Respond.js for IE8 support of HTML5 elements and media queries -->
<!-- WARNING: Respond.js doesn't work if you view the page via file:// -->
<!--[if lt IE 9]>
<script src="https://oss.maxcdn.com/html5shiv/3.7.3/html5shiv.min.js"></script>
<script src="https://oss.maxcdn.com/respond/1.4.2/respond.min.js"></script>
<![endif]-->
</head>
<body>
<div class="container">
<div class="row">
<div class="col-xs-12 col-sm-8 col-sm-push-2">
<h1 class="text-center">이더리움 부동산</h1>
<hr/>
<br/>
</div>
</div>
<div class="row" id="list">
<!-- 매물 리스트 -->
</div>
</div>
<div id="template" style="display: none;">
<div class="col-sm-6 col-md-4 col-lg-3">
<div class="panel panel-success panel-realEstate">
<div class="panel-heading">
<h3 class="panel-title">매물</h3>
</div>
<div class="panel-body">
<!-- 매물 정보 -->
<img style="width: 100%;" src="" >
<br/><br/>
<strong>아이디</strong>: <span class="id"></span><br/>
<strong>종류</strong>: <span class="type"></span><br/>
<strong>면적(m²)</strong>: <span class="area"></span><br/>
<strong>가격(ETH)</strong>: <span class="price"></span><br/><br/>
<!-- 매입 버튼 -->
<button class="btn btn-info btn-buy"
type="button"
data-toggle="modal"
data-target="#buyModal"> <!-- target*******-->
매입
</button>
<!-- 매입 완료하면 매입자 정보 볼 수 있다 -->
<button class="btn btn-info btn-buyerInfo"
type="button"
data-toggle="modal"
data-target="#buyerInfoModal"
style="display: none;"> <!-- 현재는 none으로 해놓아서 안보임 -->
매입자 정보
</button>
</div>
</div>
</div>
</div>
<!-- 모달 -->
<div class="modal fade" tabindex="-1" role="dialog" id="buyModal"> <!-- target*******-->
<div class="modal-dialog">
<div class="modal-content">
<div class="modal-header">
<button type="button" class="close" data-dismiss="modal" aria-label="Close"><span aria-hidden="true">×</span></button>
<h4 class="modal-title">매입자 정보</h4>
</div>
<div class="modal-body">
<input type="text" class="form-control" id="name" placeholder="이름" /> <br/>
<input type="number" class="form-control" id="age" placeholder="나이" /> <br/>
</div>
<div class="modal-footer">
<button type="button" class="btn btn-default" data-dismiss="modal">닫기</button>
<button type="button" class="btn btn-primary" onClick="App.buyRealEstate(); return false;">제출</button>
</div>
</div><!-- /.modal-content -->
</div><!-- /.modal-dialog -->
</div><!-- /.modal -->
<!-- jQuery (necessary for Bootstrap's JavaScript plugins) -->
<script src="https://ajax.googleapis.com/ajax/libs/jquery/1.12.4/jquery.min.js"></script>
<!-- Include all compiled plugins (below), or include individual files as needed -->
<script src="js/bootstrap.min.js"></script>
<script src="js/web3.min.js"></script>
<script src="js/truffle-contract.js"></script>
<script src="js/app.js"></script>
<script src="js/utf8.js"></script>
</body>
</html>
modal-body에 다음 hidden input type 추가!
          <div class="modal-body">
            <input type="hidden" id="id" />
            <input type="hidden" id="price" />
            <input type="text" class="form-control" id="name" placeholder="이름" /> <br/>
            <input type="number" class="form-control" id="age" placeholder="나이" /> <br/>
          </div>
app.js
App = {
  web3Provider: null,
  contracts: {},

  // ******이거!
  init: function() { // 데이터 불러오고 html에 매물정보 보이도록 한다.
    $.getJSON('../real-estate.json', function(data) {
      var list = $('#list');
      var template = $('#template');

      for (i = 0; i < data.length; i++) {
        template.find('img').attr('src', data[i].picture); // src 속성에 picture 값을 갖게 한다.
        template.find('.id').text(data[i].id);
        template.find('.type').text(data[i].type);
        template.find('.area').text(data[i].area);
        template.find('.price').text(data[i].price);

        list.append(template.html());
      }
    })

    return App.initWeb3();
  },

  initWeb3: function() {
    // dapp에 web3 인스턴스가 이미 활성화되어있는지 체크

    if (typeof web3 !== 'undefined') {
      // 브라우저에 메타마스크가 설치되어있다면
      // 주입된 web3 인스턴스가 존재하면
      // 메타마스크의 web3 인스턴스를 브라우저에 주입시키기 때문
      App.web3Provider = web3.currentProvider; // 공급자를 불러와
      web3 = new Web3(web3.currentProvider); // 그 공급자의 정보를 바탕으로 다시 우리 댑에서 쓸수있는 웹3 오브젝트를 만든다.
    }
    else { // typeof web3 == 'undefined'
      // 브라우저에 메타마스크가 설치 x
      // 주입된 web3 인스턴스 존재하지 않는다면
      App.web3Provider = new web3.providers.HttpProvider('http://localhost:8545'); // 로컬 공급자의 rpc 서버에 연결해서 공급자의 정보 가져오고 대입해라.
      web3 = new Web3(App.web3Provider); // 가나슈면 로컬호스트가 가나슈가 되는거야

    }

    return App.initContract();

    // 이제 dapp에서 이더리움 블록체인과 소통할 수 있게 되었다.
  },

  // 우리가 만든 스마트컨트랙을 인스턴스화시킨다.
  // 그래야 web3가 우리 컨트랙을 어디서 찾고 어떻게 작동하는지 알 수 있다.
  // 이 작업 편하게 하기 위해 truffle에서 라이브러리 제공 -> js 폴더의 truffle-contract.js
  initContract: function() {
		$.getJSON('RealEstate.json', function(data) {
      // 아티팩 파일은 abi 정보와 컨트랙 배포된 주소 가지고 있다. RealEstate.json
      // 아티팩 파일에 있는 데이터를 TruffleContract에서 제공하는 라이브러리 TruffleContract를 넘겨서 컨트랙을 인스턴스화 시킨다.
      App.contracts.RealEstate = TruffleContract(data);
      // 컨트랙의 공급자 설정
      App.contracts.RealEstate.setProvider(App.web3Provider);

    });
  },

  buyRealEstate: function() {
    var id = $('#id').val(); // hidden type의 id 가져오는 것 맨아래 init에서 설정 해줬음!
    var name = $('#name').val();
    var price = $('#price').val();
    var age = $('#age').val();

    console.log(id);
    console.log(name);
    console.log(price);
    console.log(age);

    // input 초기화
    $('#name').val('');
    $('#age').val('');
  },

  loadRealEstates: function() {

  },

  listenToEvents: function() {

  }
};

// dapp이 실행되고 페이지가 로드되면 app 안에 init 함수 먼저 실행 ******
// html 다 로드되었을때 어떤걸 실행하라고 정의할 수 있는 공간
$(function() {
  $(window).load(function() {
    App.init();
  });

  // 모달이 띄워져 있으면
  // 부트스트랩 모달에 데이터 전달하는 방식!
  $('#buyModal').on('show.bs.modal', function(e) {
    var id = $(e.relatedTarget).parent().find('.id').text();
    var price = web3.toWei(parseFloat($(e.relatedTarget).parent().find('.price').text() || 0), "ether");

    $(e.currentTarget).find('#id').val(id);
    $(e.currentTarget).find('#price').val(price);
  })
});
buyRealEstate와 맨아래 function에 코드 추가함!
홈페이지 새로고침하고 console 확인해봐 f12~
매입 버튼 클릭 - 이름, 나이 입력 후 제출 - 4개의 데이터 매물구입함수에서 볼 수 있고 콘솔에서 확인 가능 - input 초기화
이제 컨트랙의 buyRealEstate 함수 써볼거야
app.js의 buyRealEstate 고치기 (컨트랙의 buRealEstate와 헷갈리지 말기)
  buyRealEstate: function() {
    var id = $('#id').val(); // hidden type의 id 가져오는 것 맨아래 init에서 설정 해줬음!
    var name = $('#name').val();
    var price = $('#price').val();
    var age = $('#age').val();

    web3.eth.getAccounts(function(error, accounts) {
      if (error) {
        console.log(error);
      }

      var account = accounts[0];
      // 전역변수 기반으로 컨트랙에 접근!
      App.contracts.RealEstate.deployed().then(function(instance) {
        // utf파일 라이브러리 따로 추가했음
        var nameUtf8Encoded = utf8.encode(name); // 이걸 다시 hex로 변환해야함
        return instance.buyRealEstate(id, web3.toHex(nameUtf8Encoded), age, { from: account, value: price }); // 이더 값도 넘겨야해서 age 뒤에 하나 더
      }).then(function() {
        // input 초기화
        $('#name').val('');
        $('#age').val('');
        $('#buyModal').modal('hide'); // 모달 창 닫기
      }).catch(function(err) {
        console.log(err.message);
      });
    });
  },
그리고 가나슈에서 테스팅 해보자
restart 잘 안되네.. candy apple로 깔고 다시해보자
암튼 파워쉘에서
PS C:\Users\user\Blockchain3\real-estate> truffle migrate --compile-all --reset --network ganache
메타마스크에도 로그인 되어있나 확인!
그리고 npm run dev
매입비 + 가스비까지 같이 송금됨
된다!!!! 꺙란ㅇ랃ㄱㅁ 안되면 rpcㅇ ㅔ러 참고
6) 매입 후 UI 업데이트 1 (이미지 교체, 버튼 비활성화)
  buyRealEstate: function() {
    var id = $('#id').val(); // hidden type의 id 가져오는 것 맨아래 init에서 설정 해줬음!
    var name = $('#name').val();
    var price = $('#price').val();
    var age = $('#age').val();

    web3.eth.getAccounts(function(error, accounts) {
      if (error) {
        console.log(error);
      }

      var account = accounts[0];
      // 전역변수 기반으로 컨트랙에 접근!
      App.contracts.RealEstate.deployed().then(function(instance) {
        // utf파일 라이브러리 따로 추가했음
        var nameUtf8Encoded = utf8.encode(name); // 이걸 다시 hex로 변환해야함
        return instance.buyRealEstate(id, web3.toHex(nameUtf8Encoded), age, { from: account, value: price }); // 이더 값도 넘겨야해서 age 뒤에 하나 더
      }).then(function() {
        // input 초기화
        $('#name').val('');
        $('#age').val('');
        $('#buyModal').modal('hide'); // 모달 창 닫기

        return App.loadRealEstates(); // 이거 추가
      }).catch(function(err) {
        console.log(err.message);
      });
    });
  },
catch위에 loadRealEstates 호출하는 함수 추가!
  // 매입 후 매물 이미지 바꾸기
  loadRealEstates: function() {
    // getAllBuyers를 가져와 매입이 된 매물인지 확인하기
    App.contracts.RealEstate.deployed().then(function(instance) {
      return instance.getAllBuyers.call();
    }).then(function(buyers) {
      for (i = 0; i < buyers.length; i++) { // 10번 돌 것이다
        if (buyers[i] !== '0x0000000000000000000000000000000000000000') { //빈주소를 뜻함 0 40개
          // 팔린 매물이면 이미지 교체

          // real-estate.json에서 "picture": "images/apartment.jpg", 여기서 images/ 뒤에 부분만 가져오는 작업임.
          var imgType = $('.panel-realEstate').eq(i).find('img').attr('src').substr(7); // 이미지 이름만 가져온다

          switch(imgType) {
            case 'apartment.jpg':
              $('.panel-realEstate').eq(i).find('img').attr('src', 'images/apartment_sold.jpg')
              break;
            case 'townhouse.jpg':
              $('.panel-realEstate').eq(i).find('img').attr('src', 'images/townhouse_sold.jpg')
              break;
            case 'house.jpg':
              $('.panel-realEstate').eq(i).find('img').attr('src', 'images/house_sold.jpg')
              break;
          }

          // 해당 템플릿의 매입->매각 으로 바꾸고 버튼 비활성화
          $('.panel-realEstate').eq(i).find('.btn-buy').text('매각').attr('disabled', true);
        }
      }
    }).catch(function(err) {
      console.log(err.message);
    })
  },
그러나 새로고침하면 다시 매입 가능,,! 그래서 그것도 다시 설정해줘야해
전체 app.js를 보자.
App = {
  web3Provider: null,
  contracts: {},

  // ******이거!
  init: function() { // 데이터 불러오고 html에 매물정보 보이도록 한다.
    $.getJSON('../real-estate.json', function(data) {
      var list = $('#list');
      var template = $('#template');

      for (i = 0; i < data.length; i++) {
        template.find('img').attr('src', data[i].picture); // src 속성에 picture 값을 갖게 한다.
        template.find('.id').text(data[i].id);
        template.find('.type').text(data[i].type);
        template.find('.area').text(data[i].area);
        template.find('.price').text(data[i].price);

        list.append(template.html());
      }
    })

    return App.initWeb3();
  },

  initWeb3: function() {
    // dapp에 web3 인스턴스가 이미 활성화되어있는지 체크

    if (typeof web3 !== 'undefined') {
      // 브라우저에 메타마스크가 설치되어있다면
      // 주입된 web3 인스턴스가 존재하면
      // 메타마스크의 web3 인스턴스를 브라우저에 주입시키기 때문
      App.web3Provider = web3.currentProvider; // 공급자를 불러와
      web3 = new Web3(web3.currentProvider); // 그 공급자의 정보를 바탕으로 다시 우리 댑에서 쓸수있는 웹3 오브젝트를 만든다.
    }
    else { // typeof web3 == 'undefined'
      // 브라우저에 메타마스크가 설치 x
      // 주입된 web3 인스턴스 존재하지 않는다면
      App.web3Provider = new web3.providers.HttpProvider('http://localhost:8545'); // 로컬 공급자의 rpc 서버에 연결해서 공급자의 정보 가져오고 대입해라.
      web3 = new Web3(App.web3Provider); // 가나슈면 로컬호스트가 가나슈가 되는거야

    }

    return App.initContract();

    // 이제 dapp에서 이더리움 블록체인과 소통할 수 있게 되었다.
  },

  // 우리가 만든 스마트컨트랙을 인스턴스화시킨다.
  // 그래야 web3가 우리 컨트랙을 어디서 찾고 어떻게 작동하는지 알 수 있다.
  // 이 작업 편하게 하기 위해 truffle에서 라이브러리 제공 -> js 폴더의 truffle-contract.js
  initContract: function() {
		$.getJSON('RealEstate.json', function(data) {
      // 아티팩 파일은 abi 정보와 컨트랙 배포된 주소 가지고 있다. RealEstate.json
      // 아티팩 파일에 있는 데이터를 TruffleContract에서 제공하는 라이브러리 TruffleContract를 넘겨서 컨트랙을 인스턴스화 시킨다.
      App.contracts.RealEstate = TruffleContract(data);
      // 컨트랙의 공급자 설정
      App.contracts.RealEstate.setProvider(App.web3Provider);

      return App.loadRealEstates();
    });
  },

  buyRealEstate: function() {
    var id = $('#id').val(); // hidden type의 id 가져오는 것 맨아래 init에서 설정 해줬음!
    var name = $('#name').val();
    var price = $('#price').val();
    var age = $('#age').val();

    web3.eth.getAccounts(function(error, accounts) {
      if (error) {
        console.log(error);
      }

      var account = accounts[0];
      // 전역변수 기반으로 컨트랙에 접근!
      App.contracts.RealEstate.deployed().then(function(instance) {
        // utf파일 라이브러리 따로 추가했음
        var nameUtf8Encoded = utf8.encode(name); // 이걸 다시 hex로 변환해야함
        return instance.buyRealEstate(id, web3.toHex(nameUtf8Encoded), age, { from: account, value: price }); // 이더 값도 넘겨야해서 age 뒤에 하나 더
      }).then(function() {
        // input 초기화
        $('#name').val('');
        $('#age').val('');
        $('#buyModal').modal('hide'); // 모달 창 닫기

        return App.loadRealEstates();
      }).catch(function(err) {
        console.log(err.message);
      });
    });
  },

  // 매입 후 매물 이미지 바꾸기
  loadRealEstates: function() {
    // getAllBuyers를 가져와 매입이 된 매물인지 확인하기
    App.contracts.RealEstate.deployed().then(function(instance) {
      return instance.getAllBuyers.call();
    }).then(function(buyers) {
      for (i = 0; i < buyers.length; i++) { // 10번 돌 것이다
        if (buyers[i] !== '0x0000000000000000000000000000000000000000') { //빈주소를 뜻함 0 40개
          // 팔린 매물이면 이미지 교체

          // real-estate.json에서 "picture": "images/apartment.jpg", 여기서 images/ 뒤에 부분만 가져오는 작업임.
          var imgType = $('.panel-realEstate').eq(i).find('img').attr('src').substr(7); // 이미지 이름만 가져온다

          switch(imgType) {
            case 'apartment.jpg':
              $('.panel-realEstate').eq(i).find('img').attr('src', 'images/apartment_sold.jpg')
              break;
            case 'townhouse.jpg':
              $('.panel-realEstate').eq(i).find('img').attr('src', 'images/townhouse_sold.jpg')
              break;
            case 'house.jpg':
              $('.panel-realEstate').eq(i).find('img').attr('src', 'images/house_sold.jpg')
              break;
          }

          // 해당 템플릿의 매입->매각 으로 바꾸고 버튼 비활성화
          $('.panel-realEstate').eq(i).find('.btn-buy').text('매각').attr('disabled', true);
        }
      }
    }).catch(function(err) {
      console.log(err.message);
    })
  },

  listenToEvents: function() {

  }
};

// dapp이 실행되고 페이지가 로드되면 app 안에 init 함수 먼저 실행 ******
// html 다 로드되었을때 어떤걸 실행하라고 정의할 수 있는 공간
$(function() {
  $(window).load(function() {
    App.init();
  });

  // 모달이 띄워져 있으면
  // 부트스트랩 모달에 데이터 전달하는 방식!
  $('#buyModal').on('show.bs.modal', function(e) {
    var id = $(e.relatedTarget).parent().find('.id').text();
    var price = web3.toWei(parseFloat($(e.relatedTarget).parent().find('.price').text() || 0), "ether");

    $(e.currentTarget).find('#id').val(id);
    $(e.currentTarget).find('#price').val(price);
  })
});
맨아래에서 App.init()을 부르면
initWeb3
initContract
그리고 없지! buyRealEstate는 매입 버튼 누르면 마지막에 load를 하니까 새로고침하면 load가 첨부터 안되지
그러니까 iniContract에 하면 첨에 html 로드될때 꼬리 물면서 load도 실행되겠지!
그러니까 return문 쓰기
  initContract: function() {
		$.getJSON('RealEstate.json', function(data) {
      // 아티팩 파일은 abi 정보와 컨트랙 배포된 주소 가지고 있다. RealEstate.json
      // 아티팩 파일에 있는 데이터를 TruffleContract에서 제공하는 라이브러리 TruffleContract를 넘겨서 컨트랙을 인스턴스화 시킨다.
      App.contracts.RealEstate = TruffleContract(data);
      // 컨트랙의 공급자 설정
      App.contracts.RealEstate.setProvider(App.web3Provider);

      return App.loadRealEstates(); // 여기!!!!!!!!!!!!!
    });
  },
굿굿
7) 매입 후 UI 업데이트 2 (매입자 정보 버튼)
index.html에 모달 추가
<!-- 매입자 정보 모달 -->
<div class="modal fade" tabindex="-1" role="dialog" id="buyerInfoModal"> <!-- target*******-->
<div class="modal-dialog">
<div class="modal-content">
<div class="modal-header">
<button type="button" class="close" data-dismiss="modal" aria-label="Close"><span aria-hidden="true">×</span></button>
<h4 class="modal-title">매입자 정보</h4>
</div>
<div class="modal-body">
<strong>계정주소</strong>: <span id="buyerAddress"></span> <br />
<strong>이름</strong>: <span id="buyerName"></span> <br />
<strong>나이</strong>: <span id="buyerAge"></span> <br />
</div>
<div class="modal-footer">
<button type="button" class="btn btn-default" data-dismiss="modal">닫기</button>
<button type="button" class="btn btn-primary" onClick="App.buyRealEstate(); return false;">제출</button>
</div>
</div><!-- /.modal-content -->
</div><!-- /.modal-dialog -->
</div><!-- /.modal -->
app.js load 함수에 코드 하나 추가 -> 매입자 정보 버튼 뜨도록!
  // 매입 후 매물 이미지 바꾸기
  loadRealEstates: function() {
    // getAllBuyers를 가져와 매입이 된 매물인지 확인하기
    App.contracts.RealEstate.deployed().then(function(instance) {
      return instance.getAllBuyers.call();
    }).then(function(buyers) {
      for (i = 0; i < buyers.length; i++) { // 10번 돌 것이다
        if (buyers[i] !== '0x0000000000000000000000000000000000000000') { //빈주소를 뜻함 0 40개
          // 팔린 매물이면 이미지 교체

          // real-estate.json에서 "picture": "images/apartment.jpg", 여기서 images/ 뒤에 부분만 가져오는 작업임.
          var imgType = $('.panel-realEstate').eq(i).find('img').attr('src').substr(7); // 이미지 이름만 가져온다

          switch(imgType) {
            case 'apartment.jpg':
              $('.panel-realEstate').eq(i).find('img').attr('src', 'images/apartment_sold.jpg')
              break;
            case 'townhouse.jpg':
              $('.panel-realEstate').eq(i).find('img').attr('src', 'images/townhouse_sold.jpg')
              break;
            case 'house.jpg':
              $('.panel-realEstate').eq(i).find('img').attr('src', 'images/house_sold.jpg')
              break;
          }

          // 해당 템플릿의 매입->매각 으로 바꾸고 버튼 비활성화
          $('.panel-realEstate').eq(i).find('.btn-buy').text('매각').attr('disabled', true);
         ========================================================================
         $('.panel-realEstate').eq(i).find('.btn-buyerInfo').removeAttr('style');
         ========================================================================

        }
      }
    }).catch(function(err) {
      console.log(err.message);
    })
  },
======이부분!
index.html 에 새로운 모달 추가!
<!-- 매입자 정보 모달 -->
<div class="modal fade" tabindex="-1" role="dialog" id="buyerInfoModal"> <!-- target*******-->
<div class="modal-dialog">
<div class="modal-content">
<div class="modal-header">
<button type="button" class="close" data-dismiss="modal" aria-label="Close"><span aria-hidden="true">×</span></button>
<h4 class="modal-title">매입자 정보</h4>
</div>
<div class="modal-body">
<strong>계정주소</strong>: <span id="buyerAddress"></span> <br />
<strong>이름</strong>: <span id="buyerName"></span> <br />
<strong>나이</strong>: <span id="buyerAge"></span> <br />
</div>
<div class="modal-footer">
<button type="button" class="btn btn-default" data-dismiss="modal">닫기</button>
</div>
</div><!-- /.modal-content -->
</div><!-- /.modal-dialog -->
</div><!-- /.modal -->
app.js 맨아래 두번째 모달 위한 코드 작성
$(function() {
  $(window).load(function() {
    App.init();
  });

  // 모달이 띄워져 있으면
  // 부트스트랩 모달에 데이터 전달하는 방식!
  $('#buyModal').on('show.bs.modal', function(e) {
    var id = $(e.relatedTarget).parent().find('.id').text();
    var price = web3.toWei(parseFloat($(e.relatedTarget).parent().find('.price').text() || 0), "ether");

    $(e.currentTarget).find('#id').val(id);
    $(e.currentTarget).find('#price').val(price);
  })
============================================================
  $('#buyerInfoModal').on('show.bs.modal', function(e) {
    var id = $(e.relatedTarget).parent().find('.id').text();

    App.contracts.RealEstate.deployed().then(function(instance) {
      return instance.getBuyerInfo.call(id);
    }).then(function(buyInfo) {
      $(e.currentTarget).find('#buyerAddress').text(buyInfo[0]);
      $(e.currentTarget).find('#buyerName').text(web3.toUtf8(buyInfo[1])); // 이름은 꼭 utf 변환
      $(e.currentTarget).find('#buyerAge').text(buyInfo[2]);
    }).catch(function(error) {
      console.log(err.message);
    })
  });
  ============================================================
});
8) 이벤트를 통한 알림 메세지
컨트랙에 event 만들었었지!
다른 사람이 매입하면 나에게도 보이게
index.html에
      <!-- 이벤트가 생성되면 이곳에 메시지 추가할 것!-->
      <div id="events"></div>
추가해놓고
app.js에
  listenToEvents: function() {
    App.contracts.RealEstate.deployed().then(function(instance) { // 컨트랙의 인스턴스 받아오고
      // 필터(모든 이벤트 감지하자 그래서 비워둠), 범위(0번블록부터 최근블록까지 로그 계속 감지하도록!).감지 & callback으로 error와 event를 받는다
      instance.LogBuyRealEstate({}, { fromBlock: 0, toBlock: 'latest' }).watch(function(error, event) {
        if (!error) { // error가 없다면, event가 발살되면!
          $('events').append('<p>' + event.args._buyer + ' 계정에서 ' + event.args._id + ' 번 매물을 매입했습니다.' + '</p>');
        }
        else {
          console.error(error);
        }
        App.loadRealEstates(); // 변경된 내용 페이지에 적용시키자
      })
    })
  }
이렇게 함수 채워주고
여기서 load를 부르니까 initContract에서는 끝에 listen을 부르면되겠지!
그리고 buyRealEstate 안에있는 loadRealEstate 리턴하는거 지운다.
앞으로 매물구입하면 listen 실행되는데 이 안에 load가 있기 땜에!
최종 app.js
App = {
  web3Provider: null,
  contracts: {},

  // ******이거!
  init: function() { // 데이터 불러오고 html에 매물정보 보이도록 한다.
    $.getJSON('../real-estate.json', function(data) {
      var list = $('#list');
      var template = $('#template');

      for (i = 0; i < data.length; i++) {
        template.find('img').attr('src', data[i].picture); // src 속성에 picture 값을 갖게 한다.
        template.find('.id').text(data[i].id);
        template.find('.type').text(data[i].type);
        template.find('.area').text(data[i].area);
        template.find('.price').text(data[i].price);

        list.append(template.html());
      }
    })

    return App.initWeb3();
  },

  initWeb3: function() {
    // dapp에 web3 인스턴스가 이미 활성화되어있는지 체크

    if (typeof web3 !== 'undefined') {
      // 브라우저에 메타마스크가 설치되어있다면
      // 주입된 web3 인스턴스가 존재하면
      // 메타마스크의 web3 인스턴스를 브라우저에 주입시키기 때문
      App.web3Provider = web3.currentProvider; // 공급자를 불러와
      web3 = new Web3(web3.currentProvider); // 그 공급자의 정보를 바탕으로 다시 우리 댑에서 쓸수있는 웹3 오브젝트를 만든다.
    }
    else { // typeof web3 == 'undefined'
      // 브라우저에 메타마스크가 설치 x
      // 주입된 web3 인스턴스 존재하지 않는다면
      App.web3Provider = new web3.providers.HttpProvider('http://localhost:8545'); // 로컬 공급자의 rpc 서버에 연결해서 공급자의 정보 가져오고 대입해라.
      web3 = new Web3(App.web3Provider); // 가나슈면 로컬호스트가 가나슈가 되는거야

    }

    return App.initContract();

    // 이제 dapp에서 이더리움 블록체인과 소통할 수 있게 되었다.
  },

  // 우리가 만든 스마트컨트랙을 인스턴스화시킨다.
  // 그래야 web3가 우리 컨트랙을 어디서 찾고 어떻게 작동하는지 알 수 있다.
  // 이 작업 편하게 하기 위해 truffle에서 라이브러리 제공 -> js 폴더의 truffle-contract.js
  initContract: function() {
		$.getJSON('RealEstate.json', function(data) {
      // 아티팩 파일은 abi 정보와 컨트랙 배포된 주소 가지고 있다. RealEstate.json
      // 아티팩 파일에 있는 데이터를 TruffleContract에서 제공하는 라이브러리 TruffleContract를 넘겨서 컨트랙을 인스턴스화 시킨다.
      App.contracts.RealEstate = TruffleContract(data);
      // 컨트랙의 공급자 설정
      App.contracts.RealEstate.setProvider(App.web3Provider);

      App.listenToEvents(); // -> dapp에서 이벤트 계속 감지하도록! 이거 한번만 실행시키면 알아서 작동한다.
    });
  },

  buyRealEstate: function() {
    var id = $('#id').val(); // hidden type의 id 가져오는 것 맨아래 init에서 설정 해줬음!
    var name = $('#name').val();
    var price = $('#price').val();
    var age = $('#age').val();

    web3.eth.getAccounts(function(error, accounts) {
      if (error) {
        console.log(error);
      }

      var account = accounts[0];
      // 전역변수 기반으로 컨트랙에 접근!
      App.contracts.RealEstate.deployed().then(function(instance) {
        // utf파일 라이브러리 따로 추가했음
        var nameUtf8Encoded = utf8.encode(name); // 이걸 다시 hex로 변환해야함
        return instance.buyRealEstate(id, web3.toHex(nameUtf8Encoded), age, { from: account, value: price }); // 이더 값도 넘겨야해서 age 뒤에 하나 더
      }).then(function() {
        // input 초기화
        $('#name').val('');
        $('#age').val('');
        $('#buyModal').modal('hide'); // 모달 창 닫기

      }).catch(function(err) {
        console.log(err.message);
      });
    });
  },

  // 매입 후 매물 이미지 바꾸기
  loadRealEstates: function() {
    // getAllBuyers를 가져와 매입이 된 매물인지 확인하기
    App.contracts.RealEstate.deployed().then(function(instance) {
      return instance.getAllBuyers.call();
    }).then(function(buyers) {
      for (i = 0; i < buyers.length; i++) { // 10번 돌 것이다
        if (buyers[i] !== '0x0000000000000000000000000000000000000000') { //빈주소를 뜻함 0 40개
          // 팔린 매물이면 이미지 교체

          // real-estate.json에서 "picture": "images/apartment.jpg", 여기서 images/ 뒤에 부분만 가져오는 작업임.
          var imgType = $('.panel-realEstate').eq(i).find('img').attr('src').substr(7); // 이미지 이름만 가져온다

          switch(imgType) {
            case 'apartment.jpg':
              $('.panel-realEstate').eq(i).find('img').attr('src', 'images/apartment_sold.jpg')
              break;
            case 'townhouse.jpg':
              $('.panel-realEstate').eq(i).find('img').attr('src', 'images/townhouse_sold.jpg')
              break;
            case 'house.jpg':
              $('.panel-realEstate').eq(i).find('img').attr('src', 'images/house_sold.jpg')
              break;
          }

          // 해당 템플릿의 매입->매각 으로 바꾸고 버튼 비활성화
          $('.panel-realEstate').eq(i).find('.btn-buy').text('매각').attr('disabled', true);
          $('.panel-realEstate').eq(i).find('.btn-buyerInfo').removeAttr('style');

        }
      }
    }).catch(function(err) {
      console.log(err.message);
    })
  },

  listenToEvents: function() {
    App.contracts.RealEstate.deployed().then(function(instance) { // 컨트랙의 인스턴스 받아오고
      // 필터(모든 이벤트 감지하자 그래서 비워둠), 범위(0번블록부터 최근블록까지 로그 계속 감지하도록!).감지 & callback으로 error와 event를 받는다
      instance.LogBuyRealEstate({}, { fromBlock: 0, toBlock: 'latest' }).watch(function(error, event) {
        if (!error) { // error가 없다면, event가 발살되면!
          $('#events').append('<p>' + event.args._buyer + ' 계정에서 ' + event.args._id + ' 번 매물을 매입했습니다.' + '</p>');
        }
        else {
          console.error(error);
        }
        App.loadRealEstates(); // 변경된 내용 페이지에 적용시키자
      })
    })
  }
};

// dapp이 실행되고 페이지가 로드되면 app 안에 init 함수 먼저 실행 ******
// html 다 로드되었을때 어떤걸 실행하라고 정의할 수 있는 공간
$(function() {
  $(window).load(function() {
    App.init();
  });

  // 모달이 띄워져 있으면
  // 부트스트랩 모달에 데이터 전달하는 방식!
  $('#buyModal').on('show.bs.modal', function(e) {
    var id = $(e.relatedTarget).parent().find('.id').text();
    var price = web3.toWei(parseFloat($(e.relatedTarget).parent().find('.price').text() || 0), "ether");

    $(e.currentTarget).find('#id').val(id);
    $(e.currentTarget).find('#price').val(price);
  })

  $('#buyerInfoModal').on('show.bs.modal', function(e) {
    var id = $(e.relatedTarget).parent().find('.id').text();

    App.contracts.RealEstate.deployed().then(function(instance) {
      return instance.getBuyerInfo.call(id);
    }).then(function(buyInfo) {
      $(e.currentTarget).find('#buyerAddress').text(buyInfo[0]);
      $(e.currentTarget).find('#buyerName').text(web3.toUtf8(buyInfo[1])); // 이름은 꼭 utf 변환
      $(e.currentTarget).find('#buyerAge').text(buyInfo[2]);
    }).catch(function(error) {
      console.log(err.message);
    })
  });
});
index.html
<!DOCTYPE html>
<html lang="en">
<head>
<meta charset="utf-8">
<meta http-equiv="X-UA-Compatible" content="IE=edge">
<meta name="viewport" content="width=device-width, initial-scale=1">
<!-- The above 3 meta tags *must* come first in the head; any other head content must come *after* these tags -->
<title>이더리움 부동산</title>
<!-- Bootstrap -->
<link href="css/bootstrap.min.css" rel="stylesheet">
<!-- HTML5 shim and Respond.js for IE8 support of HTML5 elements and media queries -->
<!-- WARNING: Respond.js doesn't work if you view the page via file:// -->
<!--[if lt IE 9]>
<script src="https://oss.maxcdn.com/html5shiv/3.7.3/html5shiv.min.js"></script>
<script src="https://oss.maxcdn.com/respond/1.4.2/respond.min.js"></script>
<![endif]-->
</head>
<body>
<div class="container">
<div class="row">
<div class="col-xs-12 col-sm-8 col-sm-push-2">
<h1 class="text-center">이더리움 부동산</h1>
<hr/>
<br/>
</div>
</div>
<!-- 이벤트가 생성되면 이곳에 메시지 추가할 것!-->
<div id="events"></div>
<div class="row" id="list">
<!-- 매물 리스트 -->
</div>
</div>
<div id="template" style="display: none;">
<div class="col-sm-6 col-md-4 col-lg-3">
<div class="panel panel-success panel-realEstate">
<div class="panel-heading">
<h3 class="panel-title">매물</h3>
</div>
<div class="panel-body">
<!-- 매물 정보 -->
<img style="width: 100%;" src="" >
<br/><br/>
<strong>아이디</strong>: <span class="id"></span><br/>
<strong>종류</strong>: <span class="type"></span><br/>
<strong>면적(m²)</strong>: <span class="area"></span><br/>
<strong>가격(ETH)</strong>: <span class="price"></span><br/><br/>
<!-- 매입 버튼 -->
<button class="btn btn-info btn-buy"
type="button"
data-toggle="modal"
data-target="#buyModal"> <!-- target*******-->
매입
</button>
<!-- 매입 완료하면 매입자 정보 볼 수 있다 -->
<button class="btn btn-info btn-buyerInfo"
type="button"
data-toggle="modal"
data-target="#buyerInfoModal"
style="display: none;"> <!-- 현재는 none으로 해놓아서 안보임 -->
매입자 정보
</button>
</div>
</div>
</div>
</div>
<!-- 매입 모달 -->
<div class="modal fade" tabindex="-1" role="dialog" id="buyModal"> <!-- target*******-->
<div class="modal-dialog">
<div class="modal-content">
<div class="modal-header">
<button type="button" class="close" data-dismiss="modal" aria-label="Close"><span aria-hidden="true">×</span></button>
<h4 class="modal-title">매입자 정보</h4>
</div>
<div class="modal-body">
<input type="hidden" id="id" />
<input type="hidden" id="price" />
<input type="text" class="form-control" id="name" placeholder="이름" /> <br/>
<input type="number" class="form-control" id="age" placeholder="나이" /> <br/>
</div>
<div class="modal-footer">
<button type="button" class="btn btn-default" data-dismiss="modal">닫기</button>
<button type="button" class="btn btn-primary" onClick="App.buyRealEstate(); return false;">제출</button>
</div>
</div><!-- /.modal-content -->
</div><!-- /.modal-dialog -->
</div><!-- /.modal -->
<!-- 매입자 정보 모달 -->
<div class="modal fade" tabindex="-1" role="dialog" id="buyerInfoModal"> <!-- target*******-->
<div class="modal-dialog">
<div class="modal-content">
<div class="modal-header">
<button type="button" class="close" data-dismiss="modal" aria-label="Close"><span aria-hidden="true">×</span></button>
<h4 class="modal-title">매입자 정보</h4>
</div>
<div class="modal-body">
<strong>계정주소</strong>: <span id="buyerAddress"></span> <br />
<strong>이름</strong>: <span id="buyerName"></span> <br />
<strong>나이</strong>: <span id="buyerAge"></span> <br />
</div>
<div class="modal-footer">
<button type="button" class="btn btn-default" data-dismiss="modal">닫기</button>
</div>
</div><!-- /.modal-content -->
</div><!-- /.modal-dialog -->
</div><!-- /.modal -->
<!-- jQuery (necessary for Bootstrap's JavaScript plugins) -->
<script src="https://ajax.googleapis.com/ajax/libs/jquery/1.12.4/jquery.min.js"></script>
<!-- Include all compiled plugins (below), or include individual files as needed -->
<script src="js/bootstrap.min.js"></script>
<script src="js/web3.min.js"></script>
<script src="js/truffle-contract.js"></script>
<script src="js/app.js"></script>
<script src="js/utf8.js"></script>
</body>
</html>
powershell
PS C:\Users\user\Blockchain3\real-estate> truffle migrate --compile-all --reset --network ganache

그리고 npm run dev
다시 매물정보 초기화 되겠지
다른 유저도 이벤트 볼 수 있다
새로고침해도 이벤트 계속보여
범위설정을 fromBlock 이렇게 해서 그동안 log 다 보여주는거야
프론트엔드 개발 끝!
그런데 승인 계속 뜨는건 뭐지???????????
7. 마무리
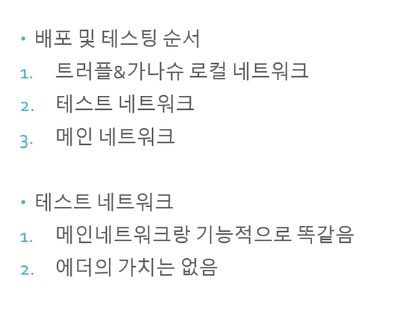
1) 공개 네트워크 컨트랙 배포 미리알기
공개네트워크 중 하나인 ropsten
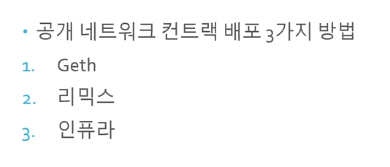
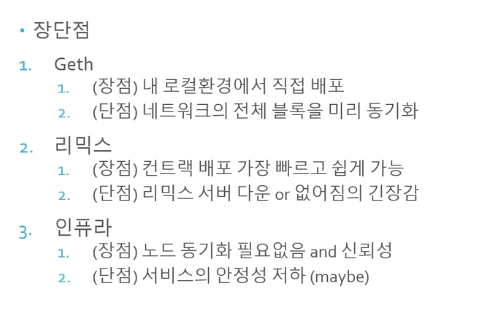
인퓨라 많이 쓴다.
리믹스 & 인퓨라 써볼게
2) 메타마스크 계정 리셋 및 에더 얻기
Rop에서 테스트넷에서 컨트랙 배포 전에 해야할일!
=> 메타마스크 기존 계정을 다 바꾸기
가나슈의 민모닉 공유 했자나
우리가 쓰던 계정으로 테스트넷, 메인넷 하면 Rop에 하면 잔액 공유하는거라서 걍 새로 쓴느게 나아
메인넷이나 테스트넷에서는 나의 고유 계정으로 테스팅하기
메타마스크 지우고 다시 설치. 아이콘 우클릭해서 지우고 다시 설치
MetaMask
You can install the MetaMask add-on in Chrome, Firefox, Opera, and the new Brave browser. If you’re a developer, you can start developing with MetaMask today. Our mission is to make Ethereum as easy to use for as many people as possible.
metamask.io
여기서 재설치
새로운 지갑 생성하면 새로운 seed 단어들이 나오는데 rop에서 쓰이게될 계정의 시드야
공유 x
rop 테스트넷으로 변경하고

계정 동그라미 클릭해서 이더스캔에서 보기 클릭
진짜 있는 계정!?
오오오 이더스캔에 트랜잭션 없다 나만을 위한 계정!!!
create account해서 두번째 계정 만들기
첫번째 계정 : 컨트랙 배포하고 매물된 금액 받는 용도
두번째 계정 : 매물을 매입하는 용도
가나슈처럼 에더 들어가있지 않다.
돈 구걸해야해 진짜 공용 네트워크 쓰는거라서
테스트 네트워크는 구걸해서 에더 얻기
Test Ether Faucet
faucet.metamask.io
현재 메타마스크에서 설정된 계정으로 1eth씩 준다
다시 다른 계쩡으로 받으려면 홈페이지 새로고침!
Ropsten Ethereum Faucet
faucet.ropsten.be
안되면 이곳에서 구걸
3) Ropsten 테스트넷 컨트랙 배포 및 테스팅 1 (리믹스 사용)
리믹스에서 쉽고 빠르게 메인넷이나 테스트넷에 컨트랙 배포 가능!
리믹스에 우리가 만든 RealEstate.sol 복붙
autocompile 체크 & 0.4.24로 바꾸기
injected로 설정하고 메타마스크에선 rop네트워크에 있어야하고 계정1로 오자. (배포용 계정으로 생각해뒀으니까)
사이트 새로고침 (계정 바꿨으니까)
컴파일 된거 확인후 배포하면 메타마스크 떠 승인 누르면 배포!!! 이더스캔으로 가보면 트랜잭셔 ㄴ있을거야
이더스캔 : 메인넷처럼 세상 모든 트랜잭션 정보를 공개적으로 보여주는 곳!
가나슈는 금방이지만 실제는 좀 오래걸린다. 근데 이더스캔 자동으로 뜬다는데 난 수동으로 들어감,,

주소가 뜨긴 뜬다!
rop네트워크에 부동산 컨트랙 배포 성공!

클릭하면 컨트랙의 트랜잭션 정보 볼 수 있다.
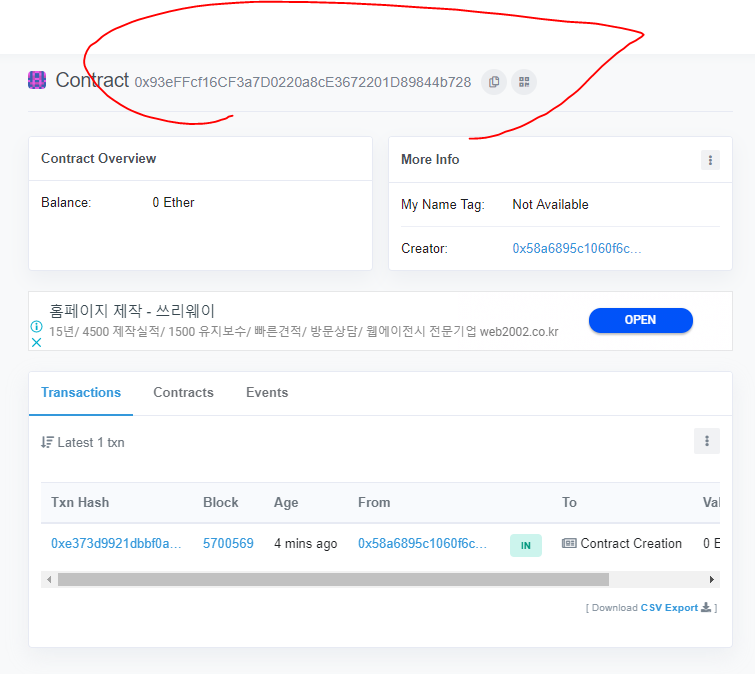
복사하고 vscode 오자
build 폴더 - RealEstate.json
맨아래 networks
ropsten 네트워크 고유 아이디인 3으로 바꾸고
address에 붙여넣기
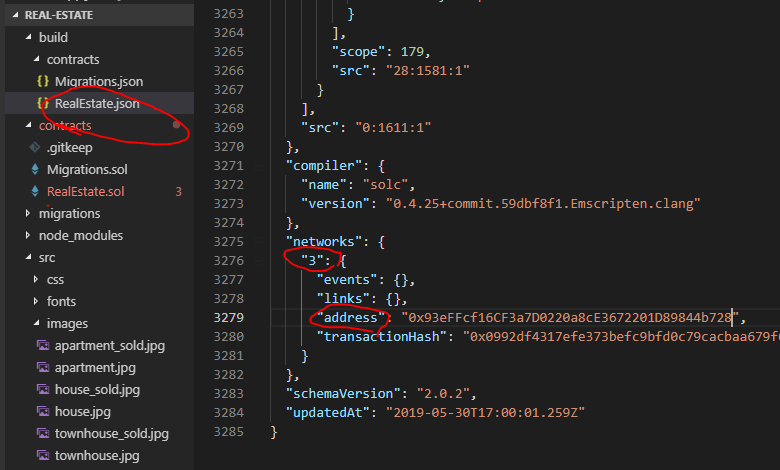
이렇게 세팅하면 모든 트랜잭션이 저 주소로 갈거야
테스팅 해보자
npm run dev
매입해보자
가스 price 1 -> 15로 해서 제출해보자 근데 내 메타마스크에는 승인버튼밖에 못눌러~

저거 누르면 이더스캔으로 가서 트랜잭션 볼 수 있다
좀 오래걸렸다
컨트랙 주소 클릭하면 새로운 줄 생겼지! (To 클릭하면 돼)
매입가 + 가스비가 계정에서 빠져나감
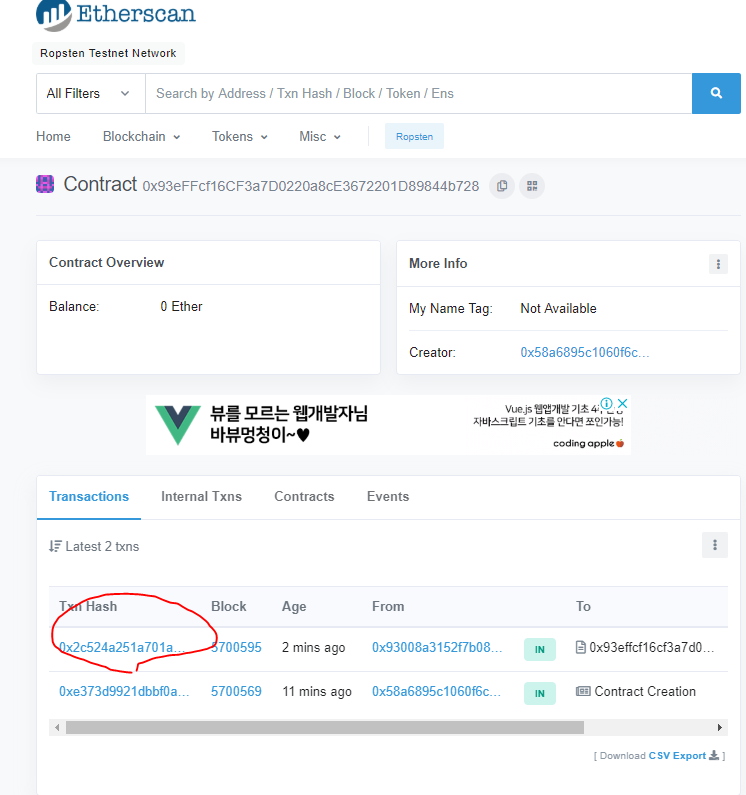
트랜잭션 해쉬 클릭하면
그 다음에 나오는게 이제 이더스캔에 공개적으로 영원히 보존되는 것.
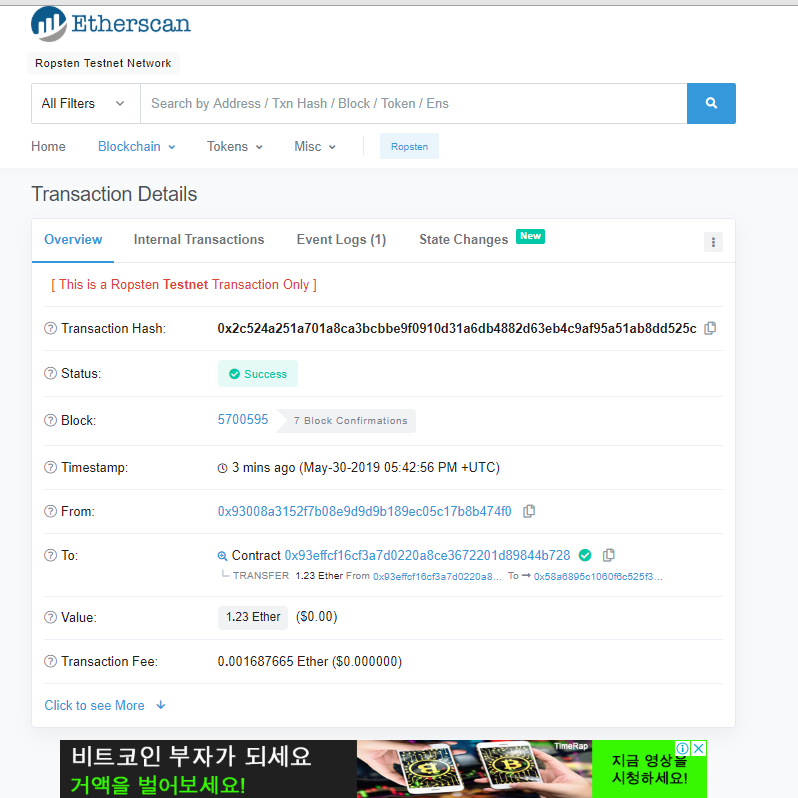
계정1과 계정2가 거래한 내역 영원히 보인다!!!!! 이게 바로 공개 장부?
3) Ropsten 테스트넷 컨트랙 배포 및 테스팅 2 (인퓨라 사용)
visual studio가 설치되어 있으면 안됨. (c프로그래밍 했을 때 그거) 그거 있으면 에러 난대
이것도 가짜 에더 필요 똑같이 하기!
truffle.js에서 환경설정 좀 해야돼
현재는 가나슈 네트워크만 쓰고 있는데
var HDWalletProvider = require("truffle-hdwallet-provider");
var mnemonic = "arctic inherit tuna canoe plastic seat seek shield vague rich prison result";

module.exports = {
     // See <http://truffleframework.com/docs/advanced/configuration>
     // to customize your Truffle configuration!
     networks: {
          ganache: {
               host: "localhost",
               port: 8545,
               network_id: "*" // Match any network id
          },

          ropsten: {
               provider: function() { // provider 명시
                    // HDWallet이 민모닉으로 메타의 첫번째 계정으로 배포한다. key는 좀따 받을거임
                    return new HDWalletProvider(mnemonic, 'https://ropsten.infura.io/apikey')
               },
               network_id: '3',
               gas: 4500000,
               gasPrice: 10000000000,
          }
     }
};
전역변수 2개와 가나슈 아래 코드 추가한 것
이제 인퓨라에서 개인 api key 받자
Infura - Scalable Blockchain Infrastructure
Secure, reliable, and scalable access to Ethereum APIs and IPFS gateways.
infura.io
get started for free

truffle 환경설정 끝
hdprovider 라이브러리를 npm 통해 다운받을거야
그전에 다운받을게 있어
파워쉘 관리자 권한으로 실행
PS C:\WINDOWS\system32> npm install --global --production windows-build-tools

> windows-build-tools@5.1.0 postinstall C:\Users\user\AppData\Roaming\npm\node_modules\windows-build-tools
> node ./dist/index.js


Downloading python-2.7.15.amd64.msi
[>                                            ] 0.0% (0 B/s)
Downloaded python-2.7.15.amd64.msi. Saved to C:\Users\user\.windows-build-tools\python-2.7.15.amd64.msi.
Downloading vs_BuildTools.exe
[>                                            ] 0.0% (0 B/s)
Downloaded vs_BuildTools.exe. Saved to C:\Users\user\.windows-build-tools\vs_BuildTools.exe.

Starting installation...
Launched installers, now waiting for them to finish.
This will likely take some time - please be patient!

Status from the installers:
---------- Visual Studio Build Tools ----------
2019-05-31T06:11:02 : Verbose : Spawning uninstall stub
2019-05-31T06:11:02 : Verbose : [InstallerImpl]: Rpc connection was closed.
2019-05-31T06:11:02 : Verbose : [InstallerImpl]: Stream was closed
2019-05-31T06:11:02 : Verbose : [SetupUpdaterImpl]: Rpc connection was closed.
2019-05-31T06:11:02 : Verbose : [SetupUpdaterImpl]: Stream was closed
------------------- Python --------------------
Successfully installed Python 2.7일괄 작업을 끝내시겠습니까 (Y/N)?
https://github.com/felixrieseberg/windows-build-tools/issues/123
Install Hangs at "Successfully installed Python 2.7" · Issue #123 · felixrieseberg/windows-build-tools
I ran the command npm install --global --production windows-build-tools from the Command Prompt as Administrator on Windows. I noticed that it was stuck at this point and pressed Control + C. It pr...
github.com
여기서 안끝나... 그래서
PS C:\WINDOWS\system32> npm i -g windows-build-tools

> windows-build-tools@5.1.0 postinstall C:\Users\user\AppData\Roaming\npm\node_modules\windows-build-tools
> node ./dist/index.js


Downloading python-2.7.15.amd64.msi
[>                                            ] 0.0% (0 B/s)
Downloaded python-2.7.15.amd64.msi. Saved to C:\Users\user\.windows-build-tools\python-2.7.15.amd64.msi.
Downloading vs_BuildTools.exe
[>                                            ] 0.0% (0 B/s)
Downloaded vs_BuildTools.exe. Saved to C:\Users\user\.windows-build-tools\vs_BuildTools.exe.

Starting installation...
Launched installers, now waiting for them to finish.
This will likely take some time - please be patient!

Status from the installers:
---------- Visual Studio Build Tools ----------
Successfully installed Visual Studio Build Tools.
------------------- Python --------------------
Successfully installed Python 2.7

Now configuring the Visual Studio Build Tools and Python...

All done!

+ windows-build-tools@5.1.0
updated 1 package in 59.98s
이렇게 했더니 됨 근데 update했다그러네 그 전에 먼저 설치는 돼됐는데 프로세스가 안끝났던거였나?
이제 폴더 루트로 와서
이제 컨트랙 재컴파일하고 랍슨네트워크에 배포하겠따!
truffle migrate --compile-all --reset --network ropsten
여기 패스
4) 요약

인퓨라로 하고 싶으면 truffle.js 몇개만 바뀌면 된다
'Study > Blockchain' 카테고리의 다른 글
| [Typescript] Typescript로 블록체인 만들기 (0) | 2020.02.16 |
|---|---|
| [블록체인/Inflearn] 리액트로 구현하는 이더리움 Dapp (0) | 2019.04.14 |
| [블록체인] 크립토좀비 - 5. ERC721 & 크립토 수집품 (0) | 2019.04.04 |
| [블록체인] 크립토좀비 - 4. 좀비 전투 시스템 (2) | 2019.04.04 |
| [블록체인] 크립토좀비 - 3. 고급 솔리디티 개념 (0) | 2019.04.03 |